Getting started
GenPresso opens into a single studio that combines a node canvas and a video timeline. Once you sign in and finish a short onboarding, you can create your first canvas and start making right away.
The screen has four areas. The top bar holds the project switcher, model-preset toggle, save/version history, Run, undo/redo, Share, a plan badge, your credit balance, notifications, and the account menu. The thin navigation rail on the left opens and closes work panels, the center places the canvas over the timeline, and the right column holds the video player and the AI Assistant chat.
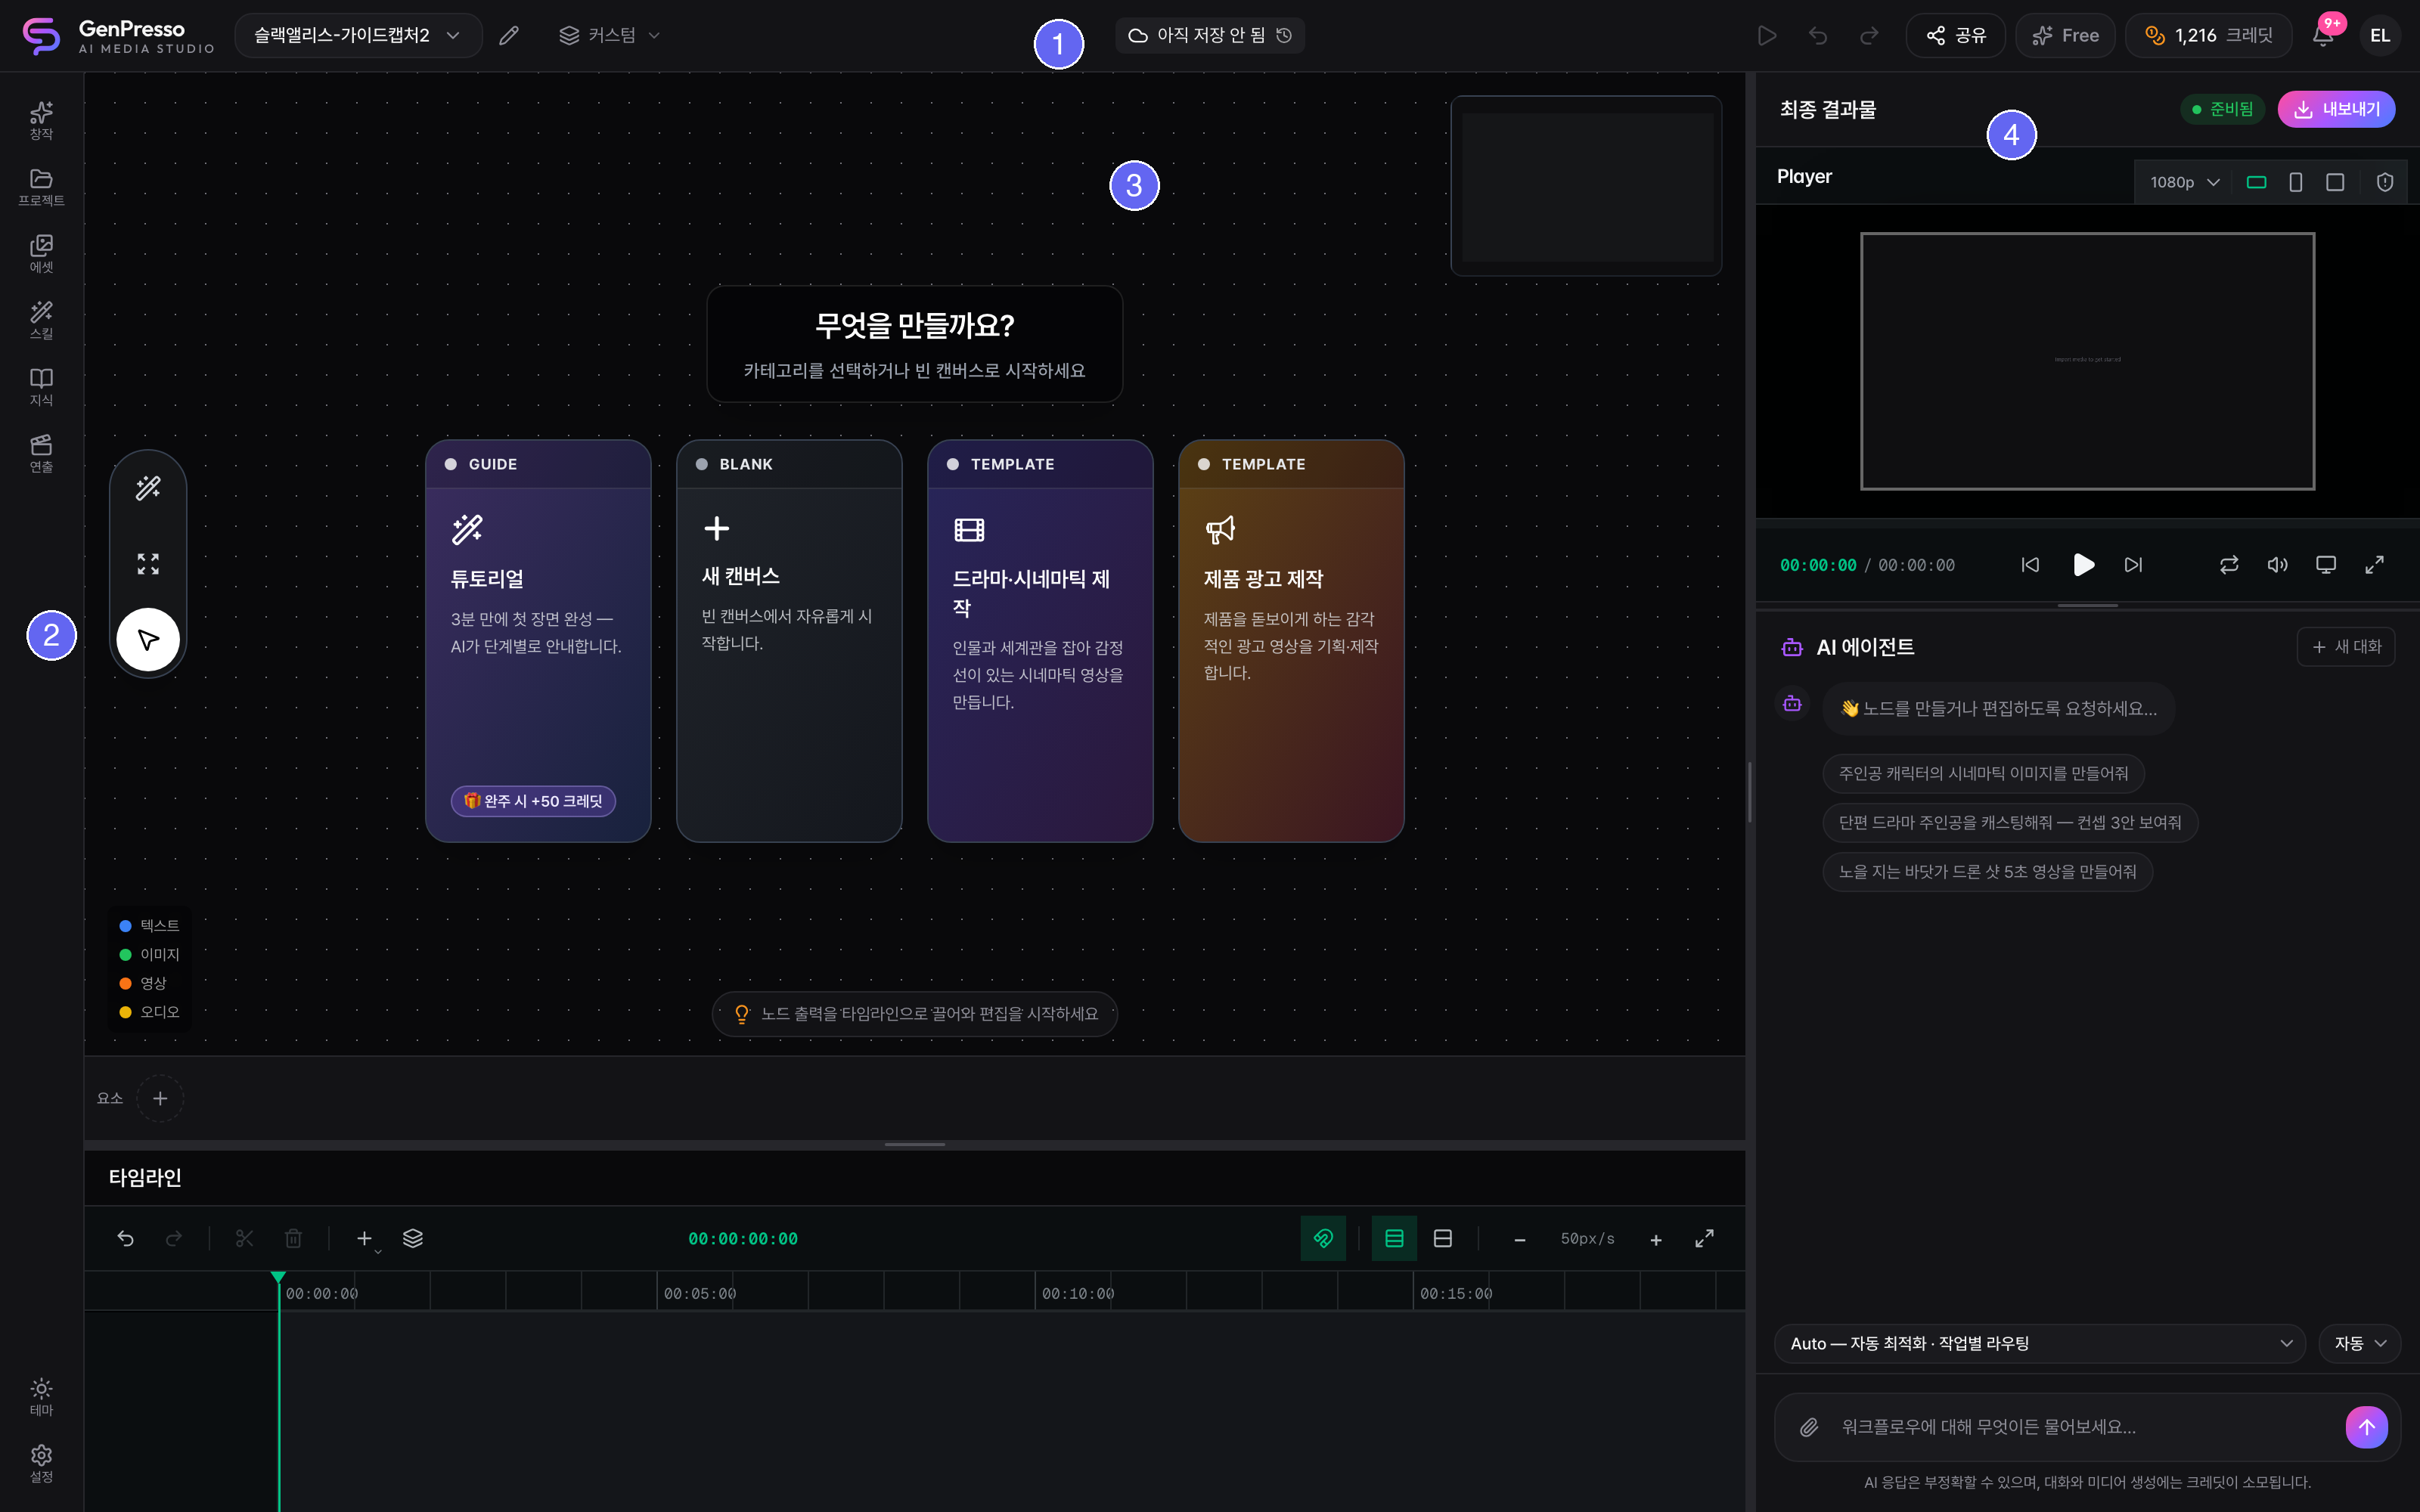
Enter the studio and make your first canvas
- 1
Sign in and onboard
Sign in from a capable desktop browser to load the studio. First-time users set a nickname (there's a randomize option) and answer a short survey; admin-created accounts also confirm terms and age here.
- 2
Claim your welcome bonus
After onboarding, a 🎉 celebration hands you your signup welcome credits. Tap the congrats button to jump straight into your first creation.
- 3
Create a canvas
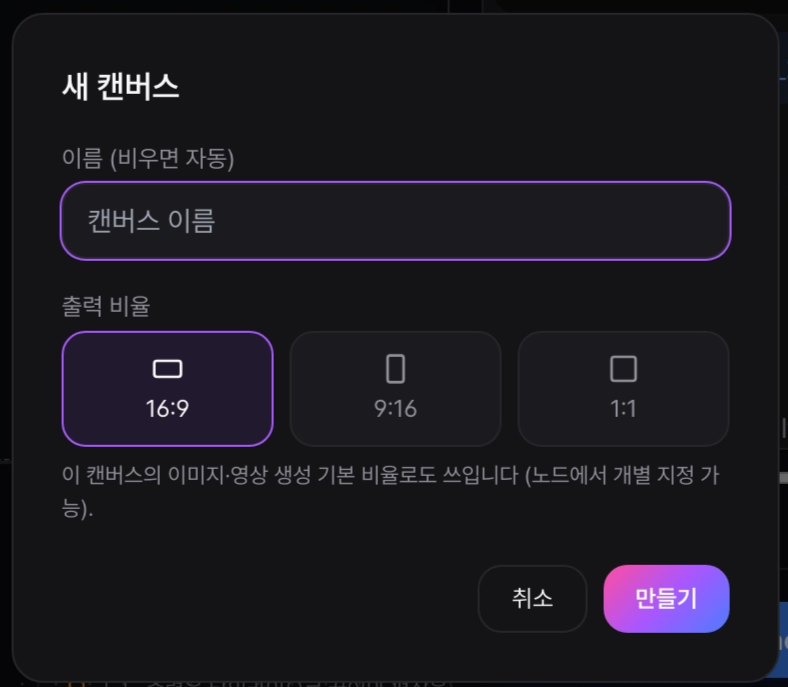
Click the current project name (chevron) in the top bar and choose '새 캔버스' (New canvas) at the bottom, or open the '프로젝트' (Projects) panel from the left rail and click '새 캔버스' pinned at the top. The name is optional — click '만들기' (Create) to finish.
- 4
Choose the output ratio
In the New Canvas dialog, pick 16:9 (wide, default), 9:16 (vertical), or 1:1 (square) under '출력 비율' (Output ratio). It becomes the canvas-wide default for image and video generation, and any node can override it later.
- 5
Start creating
From the empty-canvas starter cards, pick Blank, Drama & cinematic, Product ad, Storyboard first, or Tutorial when available. Product ad turns a short setup into an ad brief; Storyboard first reviews the plan before any generation or credit spend until you explicitly approve. You can also type what you want directly into the AI Agent chat.
The left navigation rail
- ✨ Create — tools, models, effects, and timeline editing; open by default.
- 📁 Projects — switch, rename, delete, and organize canvases into folders.
- 🖼 Assets — your account-wide media.
- 🪄 Skills — reusable workflow templates.
- 📖 Knowledge — camera and lighting methods (lenses).
- 🎬 Direction — per-scene shot scripts.
- At the bottom: Team (only if you manage one), Theme, and Settings.
Starting from an empty canvas
A node-free canvas shows the 'What shall we make?' overlay. Available paths include Blank, guided Drama & cinematic, guided Product ad, approval-first Storyboard first, and Tutorial when enabled. These cards do not immediately drop a fixed graph. Drama and Product ad collect setup details before handing a brief to the agent; Storyboard first begins with plan review; Tutorial starts its guided state machine. The overlay disappears once a node is added.
Credits power every image and video generation. Your live balance sits at the top-right next to the plan badge — click either to open Billing. New accounts get a signup bonus. Use the model-preset toggle (절약 / 균형 / 최고화질 = cheapest / balanced / best) to trade quality against credit use, and you'll get a top-up prompt when your balance runs low.
When enabled, start Tutorial from its starter card or the signup celebration. Complete six stages (tour → story direction → cast a hero → scene video with @elements → timeline placement → finish). Once casting, a successful video, and timeline placement are checked, claim the one-time +50-credit completion reward. This is separate from the one-time signup welcome bonus.
Handy to know
- Re-click an open rail icon to collapse its panel and widen the canvas; the back-chevron in a panel header returns you to the '창작' (Create) view.
- Leave the new-canvas name blank and it auto-numbers to '새 캔버스 N'.
- The theme defaults to dark regardless of your OS setting; a change from the rail's '테마' (Theme) button is saved for this browser only.
- Drag the thin divider bars to resize the timeline height and the right-hand player/chat column; the sizes are remembered.
AI Agent chat
In the AI Agent panel docked on the right side of the studio, type what you want in plain language. The agent reads your current canvas, selection, and timeline, then either talks it through or actually builds nodes, wires them together, and runs the generations — on the same credit-metered path a manual click uses.
The core flow
- 1
Type your request
In the text box at the bottom of the panel ('Ask anything about your workflow…'), write what you want in plain language and send with Enter or the up-arrow (↑) button; Shift+Enter makes a new line. A brand-new chat shows three starter chips — clicking one fills the box (it doesn't auto-send). Pure conversation like questions or script discussion just gets a reply, with nothing generated. While typing Korean, Enter only finalizes the character and doesn't send.
- 2
Pick Auto or Manual
Use the small dropdown at the right of the row just above the composer to choose 'Auto' or 'Manual'. Auto generates right away without asking; Manual shows an estimated-cost plan card, one step at a time, before anything runs. Your choice is remembered per account.
- 3
Review and approve the plan
In Manual mode, when your request would generate media, the agent posts a '📋 Plan proposal' card listing the scene outline, node count, generation-node count, and the estimated credits for the next single step. 'Yes, generate' builds exactly that step, 'Stop' cancels, and 'Modify' moves your cursor into the composer so you can say what to change and get a new proposal.
- 4
Attach references and elements
Click the paperclip in the composer or drag files onto it to attach images, video, audio, and scripts. On send, image/video/audio also drop onto the canvas as input nodes, while documents and scripts feed the project brief. Type '@name' to reference a registered character, place, or prop so it stays consistent across shots, and on a casting card you can pick one of three concepts to register it.
- 5
Watch it build and react
From one message the agent can create several nodes, connect them, and run them in order; a 'Thinking…' bubble with a stage label shows while it works. When a generation finishes, the agent takes one more turn to comment, continue, or explain and offer a fix if it failed (it won't silently re-make things that already succeeded). To move on, just click the full-width 'Continue ▸' button above the composer.
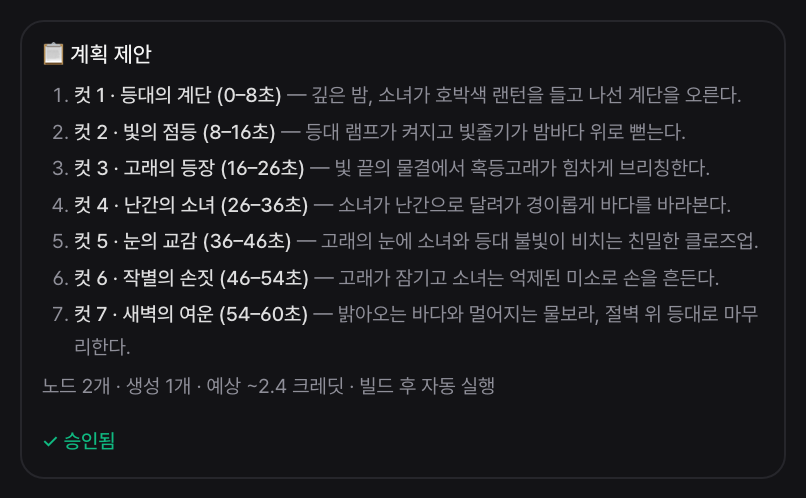
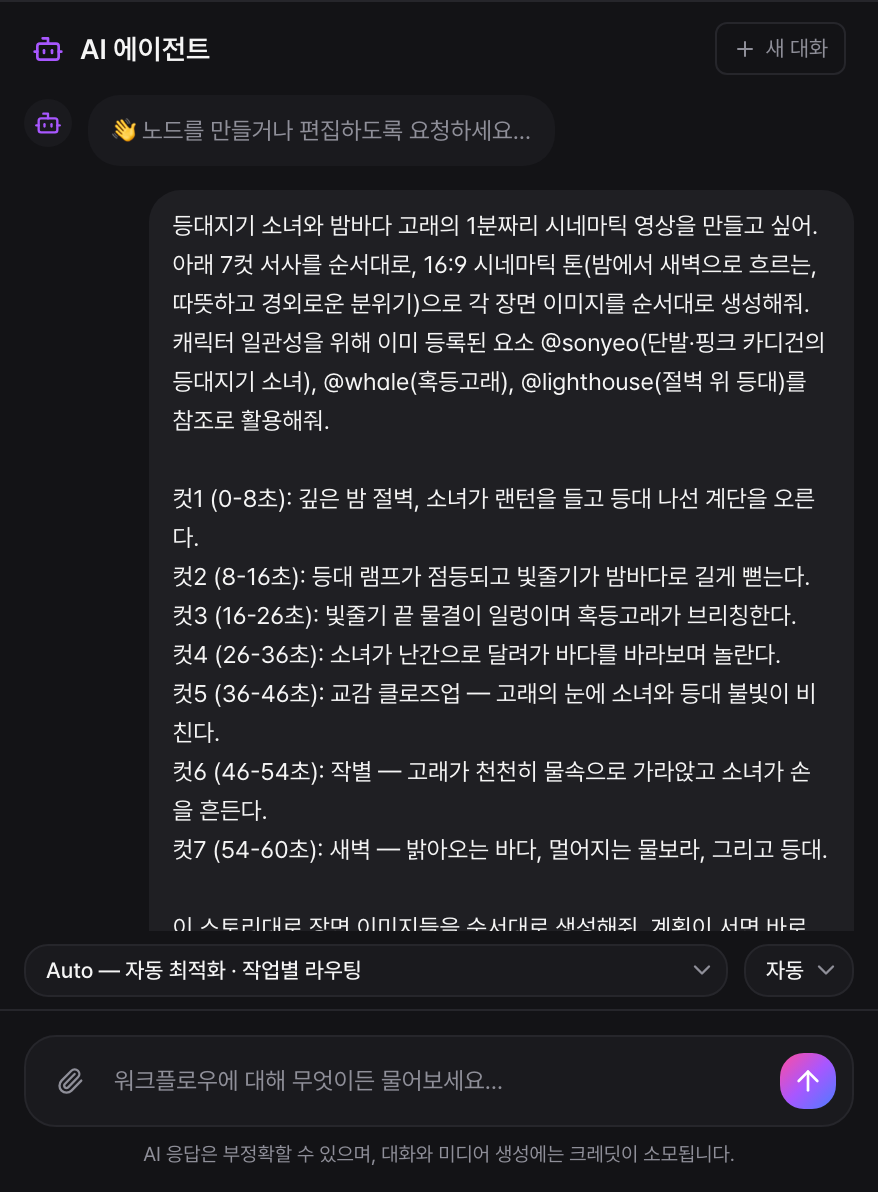
Real example: plan seven shots in one message
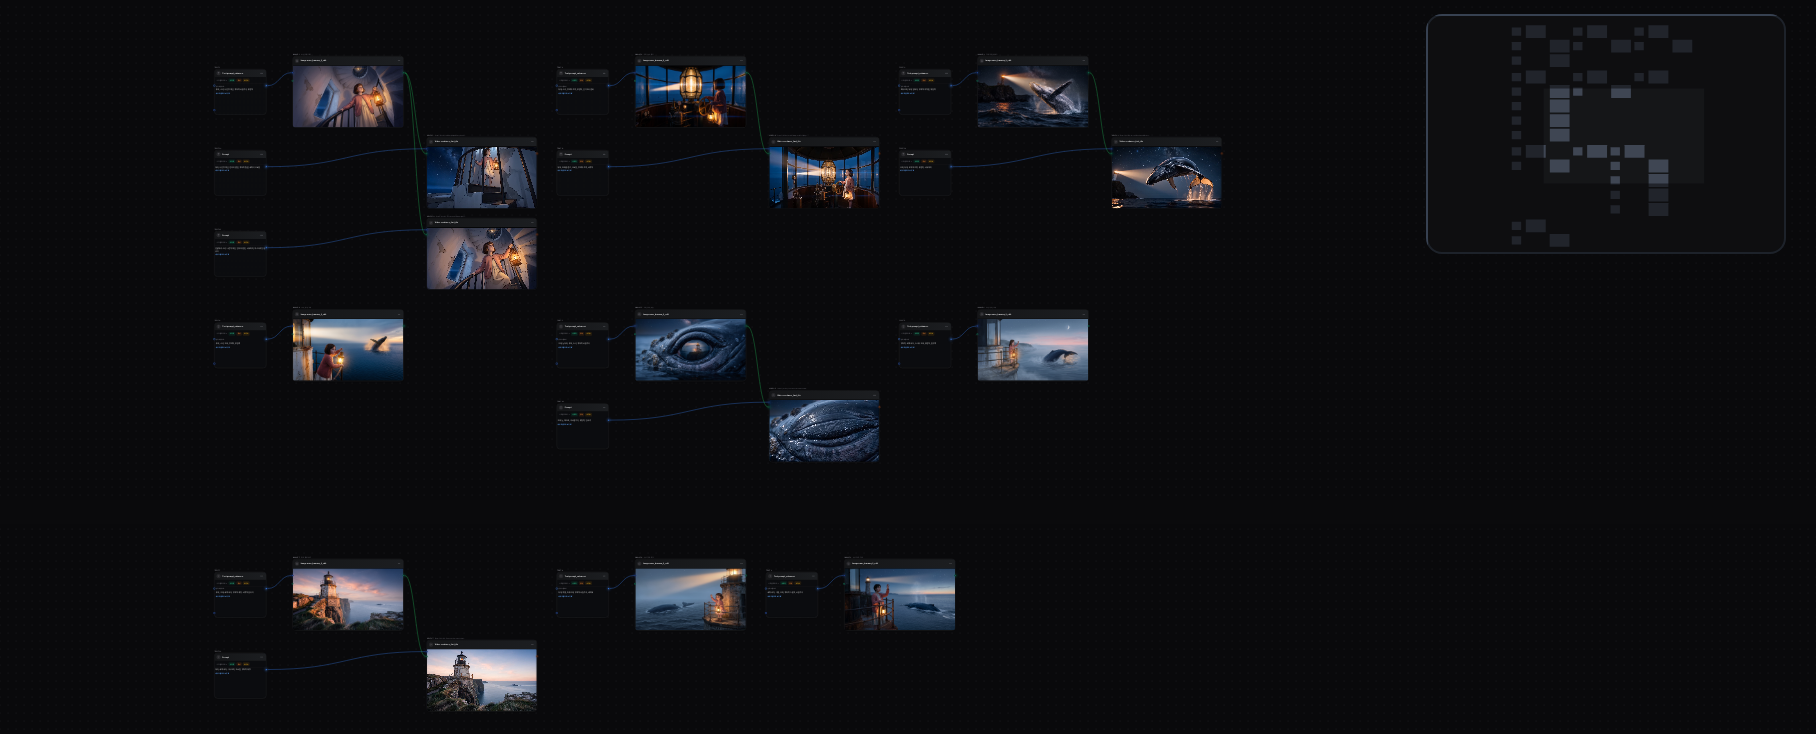
This measured example is from 2026-07-16. Instead of prompting shot by shot, the user sent the full story plus @element references in one message; the agent continued through brief review, plan proposal, node creation, wiring, and execution.
Run mode: Auto vs Manual
- Auto (◎): generates immediately without a preflight estimate card (it is not free). For safety, automatic continuation is capped at 12 turns and stops after two consecutive failures.
- Manual (✋): shows the estimated credits before generating and proceeds only after you approve with [Yes / Stop].
Buttons instead of typing
- Approve / Modify / Not now buttons under any reply that ends by asking 'Shall I continue?'. 'Not now' drops the idea and tells the agent not to ask again.
- 'Yes, generate' / 'Stop' / 'Modify' on a plan card.
- The full-width 'Continue ▸' button that appears after a build finishes or the agent pauses itself. The top-bar Run button doesn't advance a step, but it can revive a stuck or frozen chat by re-draining the queue.
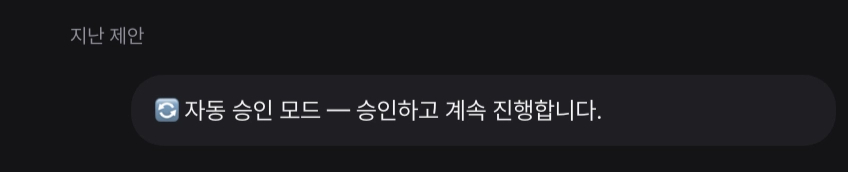
- In Auto mode these gates are clicked for you, with a '🔄 Auto-approve mode — approved, continuing' notice.
Other controls
- Brain model: the dropdown at the left of the row above the composer picks which model plans your work. Auto routes each step, while 🔒 models require at least the plan shown in the picker.
- Translation: messages written in a language other than your app language are auto-translated into yours, and the '🌐 Translated · Show original' toggle under a message flips to the original. In a shared project each person sees the thread in their own language.
- New Chat, Stop, queue: 'New Chat' at the top-right clears the conversation (and stops any in-flight run); while the agent works, the send button becomes a Stop (■) button. In a shared project everyone's messages are processed one at a time and you can clear the queue.
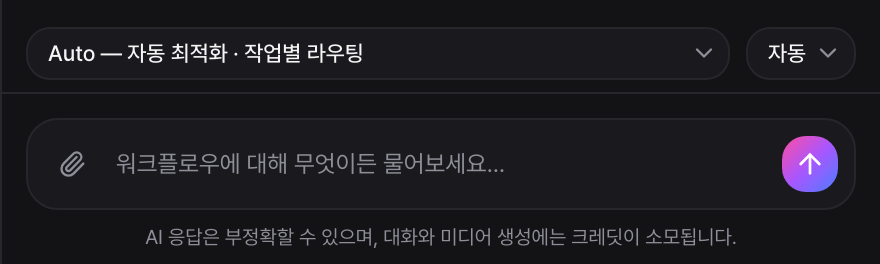
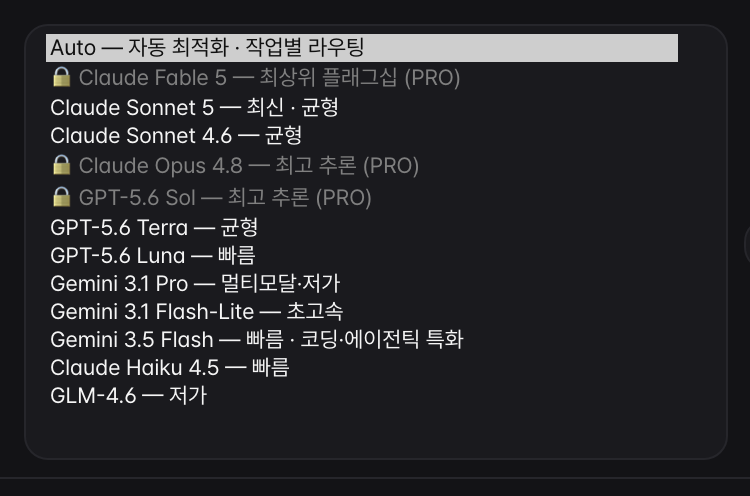
Set the run mode before asking for something expensive: 'Manual' shows the estimated credits and waits for your approval on each generation, while 'Auto' just goes and pauses only on long builds. Also select the target canvas node(s) or timeline clip(s) before you type — the agent treats your current selection as the target of the request.
Auto mode auto-approves the 'Shall I continue?' gates for you (you'll see a 🔄 auto-approve notice) — switch to Manual to review every generation and its cost first. Documents and scripts never land on the canvas (only images/video/audio do); they go to the project brief. If you @mention a character, place, or prop that isn't registered yet, the agent first offers to register it (a registration or casting card) so it stays consistent across shots. With 'view-only' access you can read the thread and see translations but can't type, attach, approve, or run.
Node canvas
The node graph at the center of the studio. Each node is one generation step — you wire one node's output into another's input, produce media, then drag it onto the timeline.
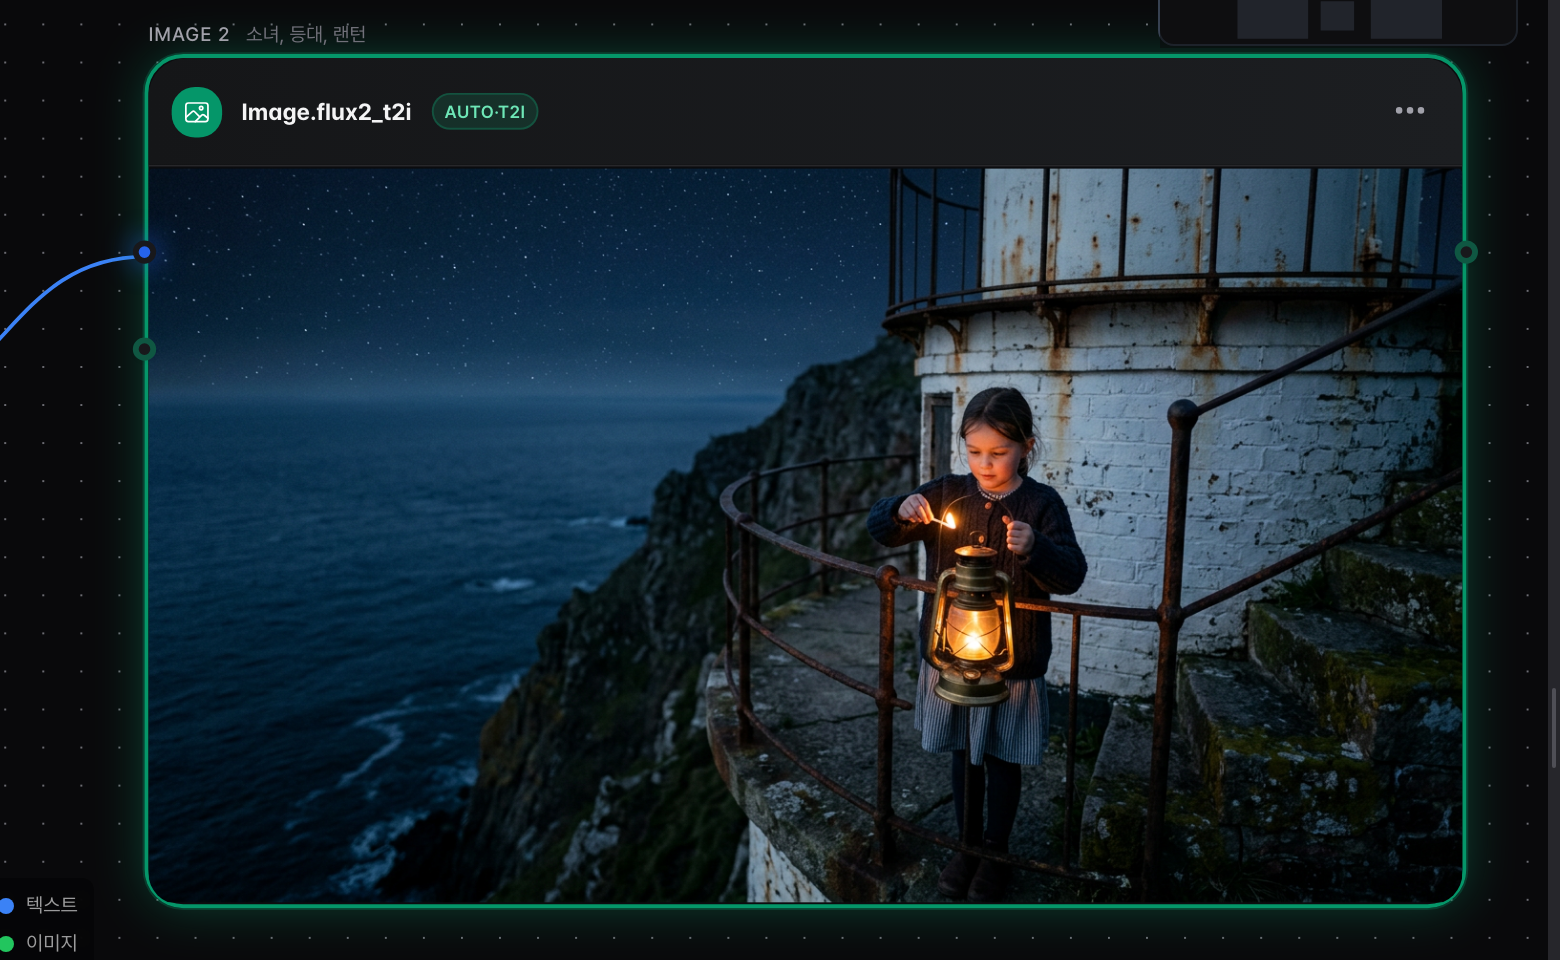
The core flow
- 1
Place a node
Right-click an empty spot on the canvas to open the node palette, then pick a category (Text, Image, Video, Audio, Skills, API) and a model — or type into the 'Search nodes or models' box to jump straight to one. The left Tools panel also lets you click or drag common input and generation nodes onto the canvas.
- 2
Wire nodes together
Drag from one node's output dot to another node's input dot to draw an edge. Colors mark the type — blue = text, green = image, orange = video, yellow = audio. Drag from an output dot onto blank canvas and release to open a palette pre-filtered to compatible nodes, creating the new node already connected.
- 3
Adjust the model and settings
Click a node and the right-hand inspector shows a model dropdown plus its Inputs, Parameters, and Additional settings. Change the model or enter values here.
- 4
Generate
Click the blue 'Generate' button at the bottom of the inspector to produce that node (it shows the cost, e.g. $0.03 or Free). To process many at once, press the Run button in the top bar to re-run every pending or failed node in dependency order.
- 5
Use the result
The finished image, video, or audio lives inside its node. If you ran it several times, flip through past results with the 1/N carousel above the node, and drag the media onto the timeline to add it as a clip.
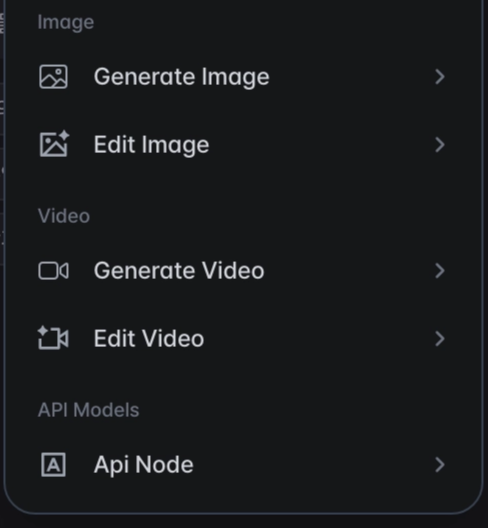
Nodes you can place
- Text (LLM/prompt), Image (Generate/Edit), Video (Generate/Edit), and Audio (Generate) nodes
- Skills (Function Skills, only when any exist) and API Model nodes
- Input/source nodes — Text/Image/Video/Audio passthrough and a directly editable 'Prompt' node
- Utility nodes — Prompt Concatenator and Video Combiner
The AI assistant designs the node chain and runs it for you, so you rarely need to wire and Generate node by node. The per-node Generate and the top-bar Run are there for manual tweaks and re-runs.
Tidy and organize
- Select 2 or more related nodes to get a '+ Group' button that wraps them in a named, colored box. Drag a node out of the box and it leaves the group automatically.
- The wand ('Optimize layout') analyzes both dependencies and node meaning, creates or updates labeled group boxes, and lays the graph out by group without collisions. The frame button ('Focus') fits the view to your selection or the whole graph.
- Use the top-right minimap and mouse-wheel zoom to move around a large graph quickly.
There is no whole-graph 'Run All' button — full-chain runs come from the AI assistant or the top-bar Run (pending/failed only). And a finished result node has no 'Generate' button because it already is the output; to iterate, add a new edit node downstream or ask the assistant.
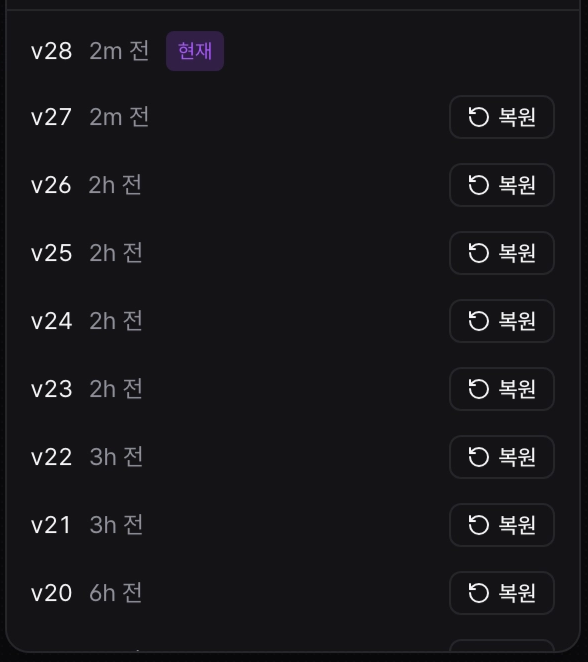
Every save adds a new version. Click the 'Saved' indicator in the top bar to open the recent-version list, and hit 'Restore' to bring an older version back as the new latest (graph and timeline together) — and the restore itself is undoable. A canvas shared with you as view-only opens for pan and zoom only, with editing, generating, and version controls hidden.
Generation models & output
Choose the model that makes your image, video, or audio, set default models per task, dial in the output ratio and resolution, then export the finished video.
Choosing a model
Open the Models tab in the tools panel to see the full catalog, grouped into five sections: image, video, and audio generation, text generation, and specialist tools. Use the search box at the top to filter by name or capability (e.g. "video").
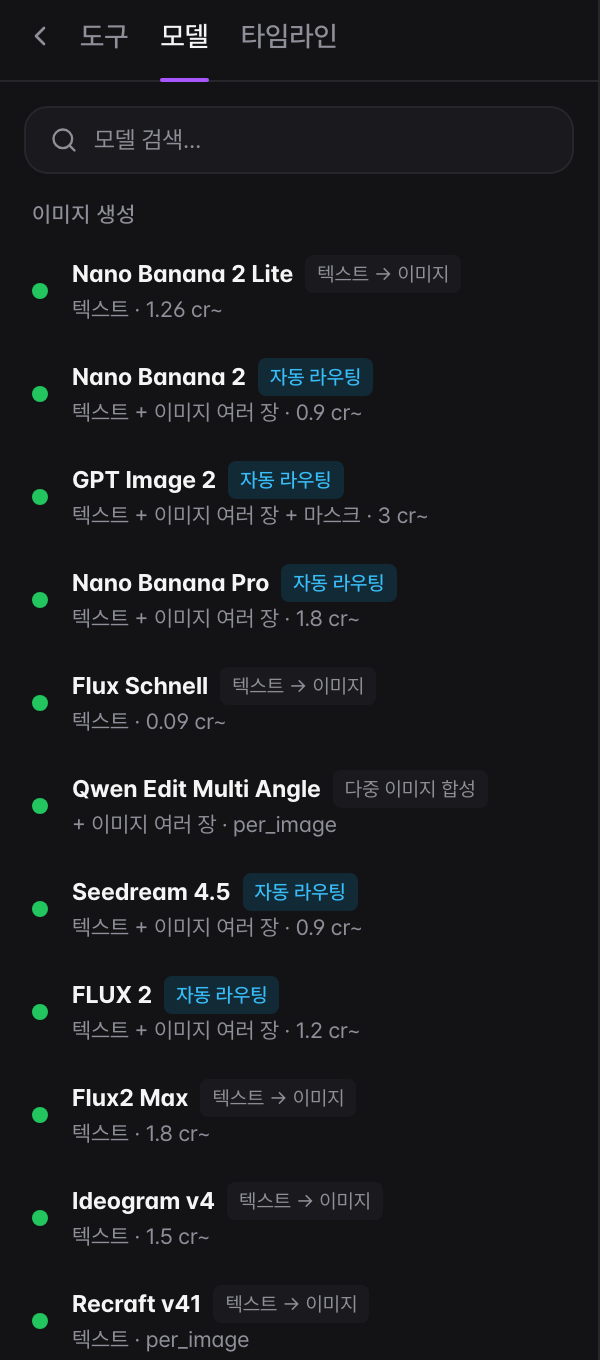
- 1
Open the Models tab and search
Click the Models tab in the tools panel and, if needed, type a style or capability into the search box to narrow the list.
- 2
Read the card
Each card shows a name, a capability badge (e.g. Text → Image, Image → Video), a hint of what input it needs, and a starting credit price (e.g. "3 cr~").
- 3
Add it to the canvas
Click a card to drop a node for that model on the canvas and open its inspector. You can also drag a card onto the canvas to place it exactly where you drop it.
- 4
Set the output ratio
In the Final Output player, use the top-right toggle to pick 16:9, 9:16, or 1:1. The ratio is saved per project and applies on export and to new generations.
- 5
Export the final video
When the timeline is ready, use the Export button at the top of the Final Output panel to render and download an MP4 first, then attempt to save it to your library. A library-save failure does not remove the downloaded file.
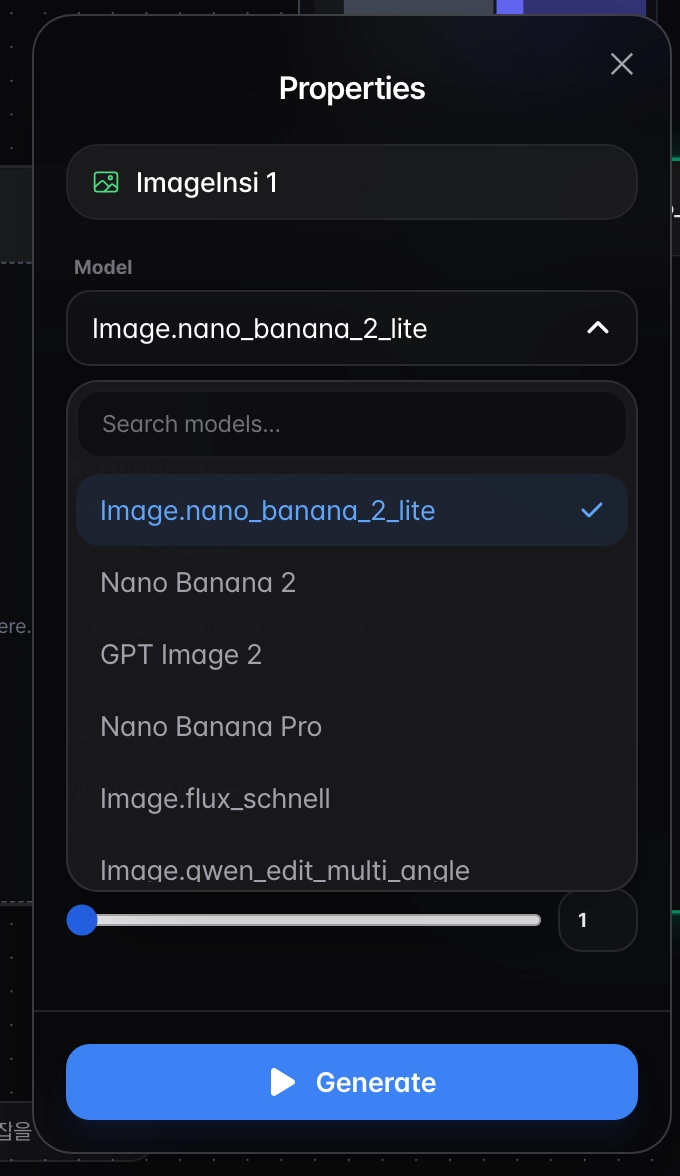
What the cards tell you
- A card with an "Auto-routing" badge is a model family that bundles several variants. The right variant is chosen automatically from what you wire in — reference images, a starting frame, a video, and so on.
- A model card with a lock and a required-plan label needs that plan or higher. A locked model won't drop a node — the upgrade prompt shows the required plan instead.
- The price is a "starting from" credit figure (~) measured at minimal settings; richer settings can cost more.
- Post-processing like upscaling, background removal, reframing, and lip-sync lives as separate cards in the Specialist tools group.
Default model per task
In Settings under Default models, pick your go-to model for each task — image generation/editing/upscale/background removal, video generation/editing, and music/SFX/voice. Your choice applies first both when you create nodes yourself and when the AI assistant does. Leave it blank to use the system default.
To skip choosing each one, apply a Budget, Balanced, or Best quality preset set to fill in every task's default at once. For image and video, a single combined "generation" dropdown lets you pick a family, and its variants fill the underlying tasks together.
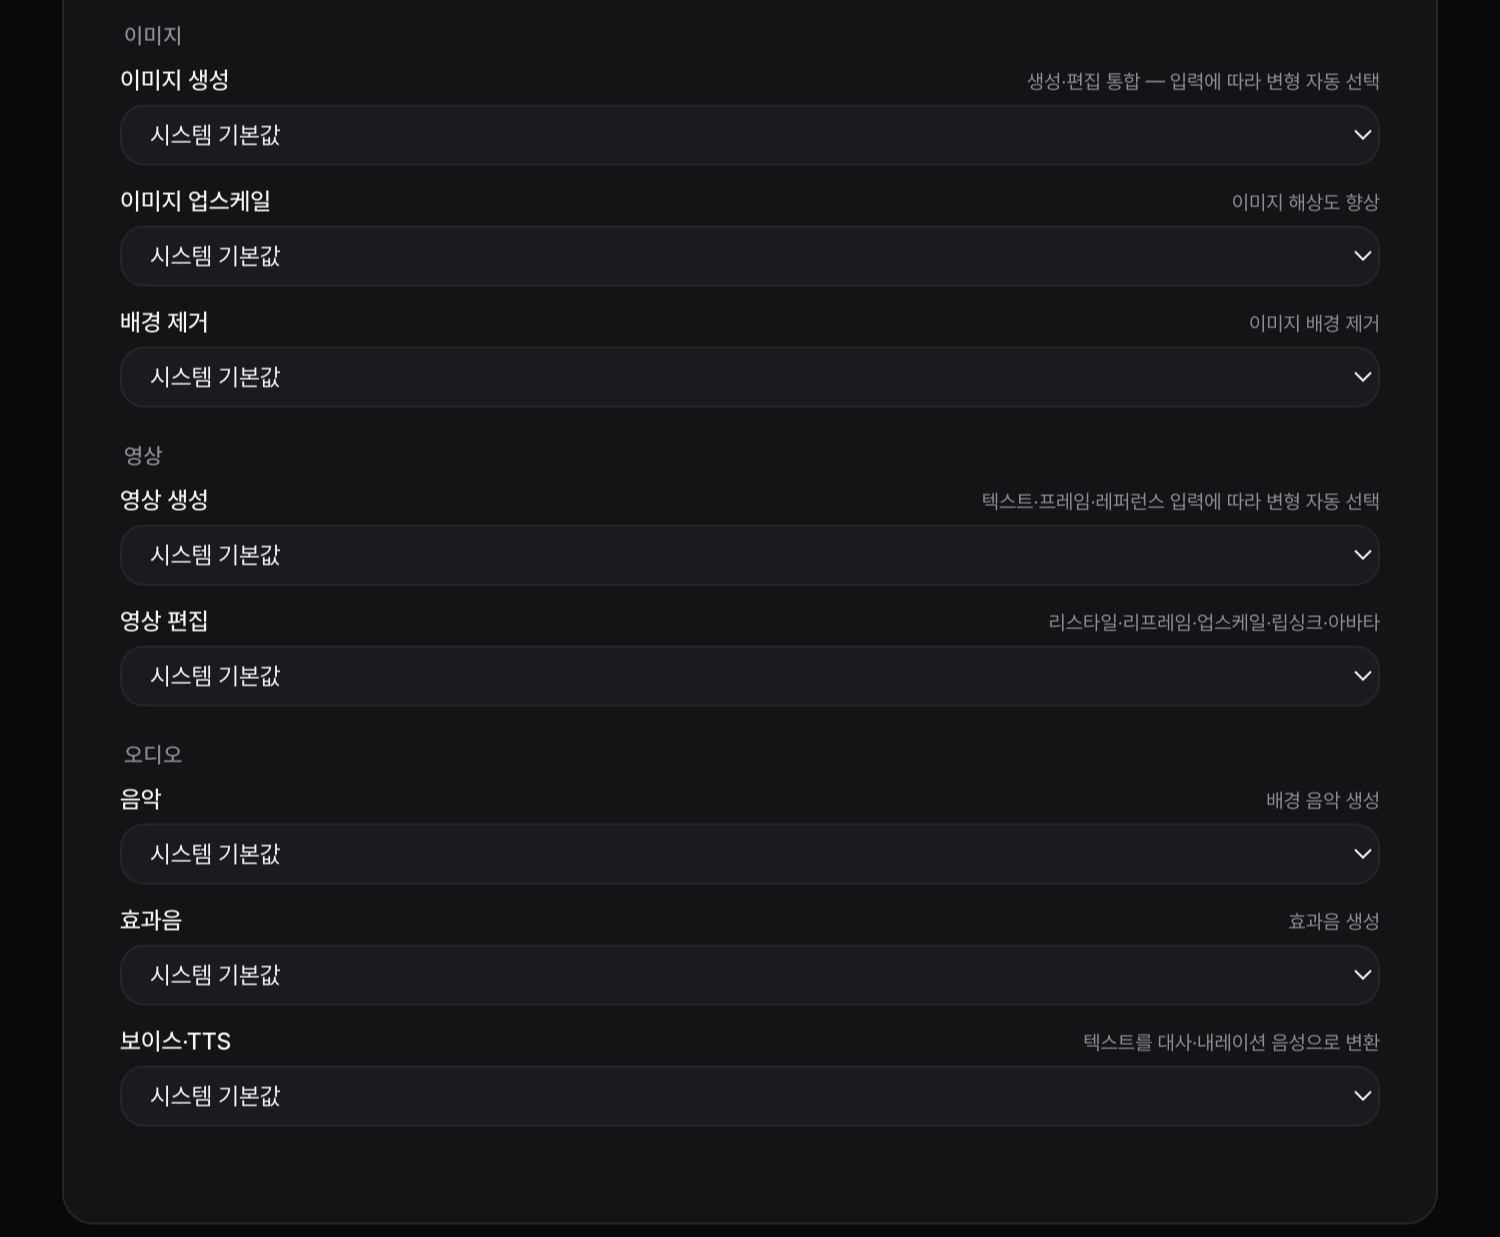
Output ratio & resolution
Next to the ratio toggle, a dropdown sets the export resolution: 480p, 720p, 1080p, or 4K. It changes resolution while keeping your ratio. If the timeline runs over 2 minutes, 4K is blocked and capped at 1080p to protect memory.
To compare models on the same idea, drop several model cards as separate nodes, run them side by side, and eyeball the results. The shield button adds a small "AI" mark to the bottom-left on export (off by default; the frame itself is unchanged).
Compare models with the same prompt


Reusable Elements & Casting
Register an actor (character), place, prop, or audio under a short @handle. Your own elements work across your account's canvases, team-shared elements within that team, and each canvas pins or casts the ones it needs.
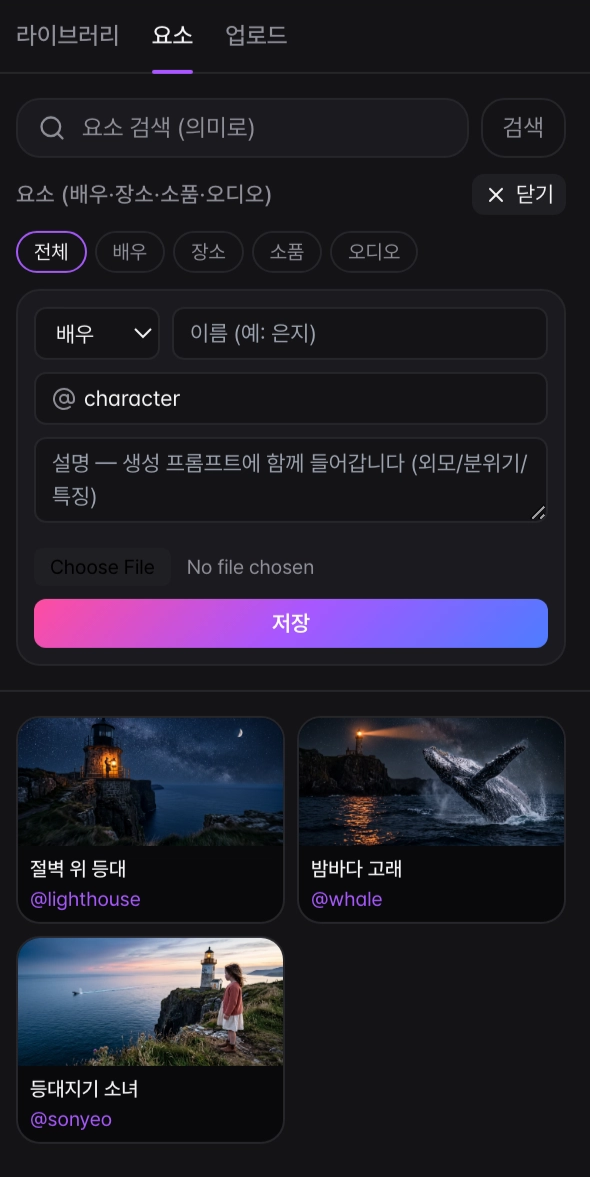
An element is an actor (character), place, prop, or audio registered for reuse. Type its @handle (call_id) in chat or a prompt to inject its real name and locked description, plus its reference image on supporting models. Personal elements are account-scoped, team-shared elements are team-scoped, and pinned or cast project elements are resolved too.
Register and summon
- 1
Start a new element from the Elements bar
Find the thin 요소 (Elements) bar just above the timeline at the bottom of the canvas. Click the dashed '+' button (Register element) at its right end and choose '새 요소' (New element).
- 2
Fill in the registration form
Pick a category (actor / place / prop / audio), type a Name (e.g. 은지), set the @call_id (auto-filled from the name, fully editable), and write a Description. Choose an image source — upload, library, or no image — then press 저장 (Save).
- 3
Summon it with @call_id
Type @call_id (e.g. @eunji) in an AI chat message or a text/prompt node. On generation it's swapped for the real name, the locked description is appended, and the reference image is attached to supporting models. You can mention several elements in one prompt (e.g. @eunji @garden).
- 4
Copy, preview, and manage from the chip
On a chip in the 요소 bar, click the '@call_id' text to copy the handle, or click the thumbnail to open a large preview (Change image / Copy @call_id). For a chip with no image, click its icon to link one from the library; hover and click X to unpin it from this canvas.

Ways to register
- Quick-register from the 요소 bar: dashed '+' > New element. It auto-pins to the current canvas, so the chip appears immediately.
- 에셋 (Assets) panel › 요소 (Elements) tab: your account-wide library. Use 요소 등록 (+) for the same form, and filter with category chips or the meaning-based search. Elements registered here are NOT auto-pinned to a canvas.
- AI proposal & casting cards: the AI suggests detected characters/places/props as chat cards. Press 등록 (Register) / 거절 (Reject), or for a character click your favorite portrait among the variants to register it instantly and auto-reference it in later scenes.
- Register from a result: a liked image tile's '요소로 등록' (Register as element) jumps to the 에셋 › 요소 tab with the form pre-filled — that image as the reference and its prompt seeded into the description. Just set the name and handle, then save.
The Description is your real consistency lever. It's appended to every prompt that @-mentions the element — a locked "visual anchor" — so put the durable look, wardrobe, mood, and traits there. Pick a short, memorable lowercase @call_id since that's what you'll type into prompts.
A call_id must be lowercase letters, digits, or underscore (2–32 chars), must be unique per account, and cannot be changed after creation (only the name, description, and image are editable). When you attach an image to a character (배우) element it must show exactly one clearly visible face — an image with zero or 2+ faces is rejected (registering a character from a description alone, with no image, is fine). Swapping the image later runs the same check.
Good to know
- Pinning differs: registering from the 요소 bar auto-pins to this canvas, while registering from the 에셋 › 요소 tab only adds to the library (pin it later via the bar's '+' > existing-element list). The bar shows only this canvas's pinned elements; the 에셋 tab shows your whole account library.
- Register with no image: create it from a description only, then attach a reference later via the chip thumbnail or its 이미지 변경 (Change image) button.
- When you mention several elements, character references are attached first, so a face-lock survives even if a place or prop appears earlier in the prompt.
- The reference image is attached only to models that accept image references; other models still get the name and description, just no picture. Also, AI auto-proposals and casting cover only character/place/prop — audio must be registered manually.
Skills & Knowledge
A skill is a reusable recipe node you drop on the canvas and run on demand; a knowledge lens is methodology the agent quietly applies across all your work. You can drive them by hand on the canvas, or just describe what you want in chat and let them fire automatically.
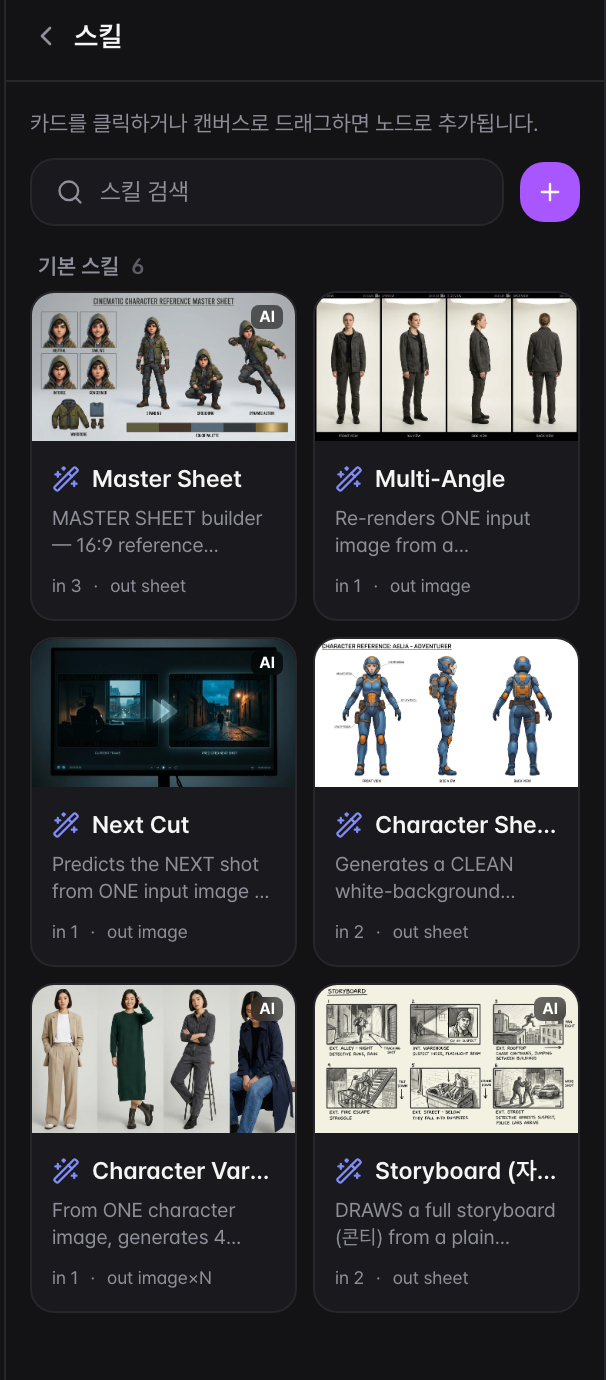
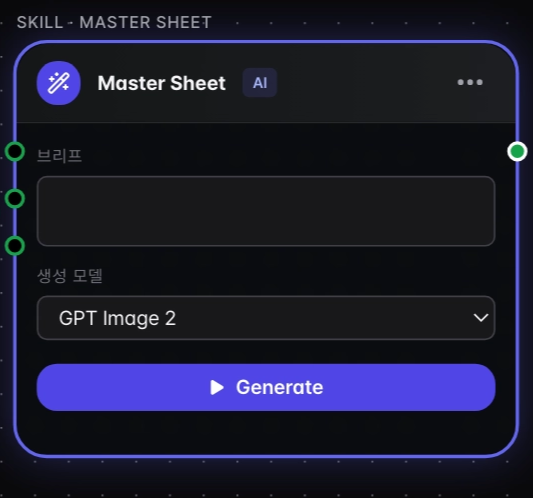
Skills live as cards in the left Skills panel. Open it with the wand-shaped Skills icon in the icon rail, and click the same icon again to collapse it. Cards are split into My skills (내 스킬), Team skills (팀 스킬), and Built-in (기본 스킬), and the search box at the top (스킬 검색) filters by name. Each card's footer 'in N · out kind' tells you at a glance how many inputs it needs and what it produces; an AI badge marks a reasoning skill, and a person icon plus a 'team' badge marks one shared with your team.
Run a skill on the canvas
- 1
Open the Skills panel
Click the wand-shaped Skills icon in the icon rail to swap the side column to the skills gallery.
- 2
Add the node
Click a card to drop its node on the canvas (an 'Added to canvas' toast confirms), or drag the card and release it at the exact spot you want.
- 3
Wire an input
Drag a wire from an upstream generation node's output into the skill node's left-side input handle. Handles are labeled by role (e.g. 이미지) with a * for required inputs.
- 4
Adjust the controls
Set the on-node sliders, dropdowns, toggles, number, or text fields as you like. A skill with no controls shows the note '이 스킬은 입력만으로 실행됩니다' (it runs on its inputs alone).
- 5
Press Generate
Press the blue Generate button; the result is created as new output node(s) auto-wired to the right, with a '생성 중…' (Generating…) spinner while it runs. Press again with different values to fan out variants without overwriting the previous output.
Knowledge lenses
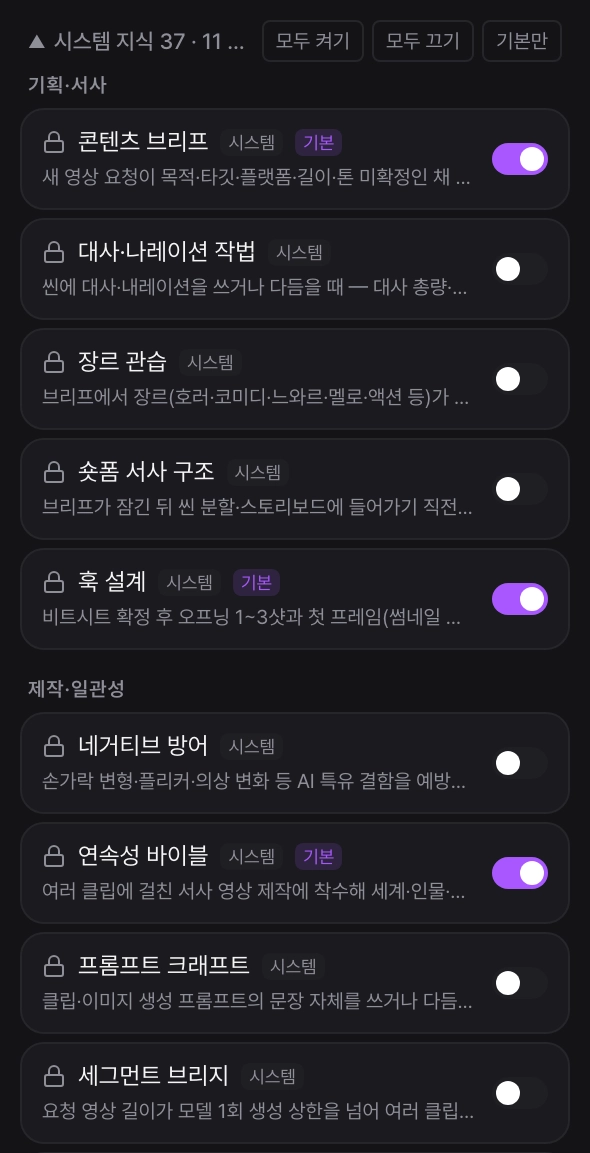
Click the book icon labeled Knowledge (지식) in the rail to open the Knowledge tab. Each lens is a row with a name, a short 'when to use' note, and a toggle on the right; flipping it on applies that methodology globally, across every project, not just the current one. There's a cap on how many can be active at once — exceeding it shows 'Max N active lenses,' so prune before adding. If you've toggled a lot on and off, the Defaults button (기본만) snaps system knowledge back to its baseline. System lenses are locked, so you can only turn them on or off, not edit them.
Make your own
- Custom skill: use the '+' button next to the search box at the top of the Skills panel to author one by editing a JSON template (node manifest required). Press Create (만들기) and it appears under My skills; bad JSON is rejected with 'JSON 형식 오류.' There's no visual builder.
- Custom lens: in the Knowledge tab, the New button (새 지식) lets you add your own lens — a name, a 'when to use' trigger, a category, and the methodology body. The trigger is what the agent reads to decide when to apply it, so write it clearly in one or two sentences.
- Team share: if you're on a team, click the Share icon on your own skill or lens card to push it to everyone's panel automatically (on skill cards the icon appears on hover; unshare and delete sit in the same spot). These team controls only appear when you actually belong to a team.
Skill nodes are skipped by the canvas Run-all — they only run from their own Generate button, and running the whole graph won't fire them. A skill also holds no output of its own: every Generate spins up brand-new output nodes to the right and never overwrites an existing image, so nudge a slider or dropdown and press again to fan out variants side by side. If a required input isn't wired, you'll get a toast telling you to connect a generated image to that input first.
Don't confuse the two similarly named surfaces. The left-side Skills panel in the studio drops runnable nodes onto your canvas. The separate 'Templates' page instead uses each card's 'Start with this template' button to pre-fill the chat with a plain-language request and send you into the studio — send that message and the agent picks the skill for you. The rail's Skills item opens the panel, not the Templates page.
Selective shot editing
Refine a narrative video shot by shot. The Direction panel has nine editable fields plus A/B/C priority and direction-audit information; seven production fields can also be regenerated one part at a time with AI.
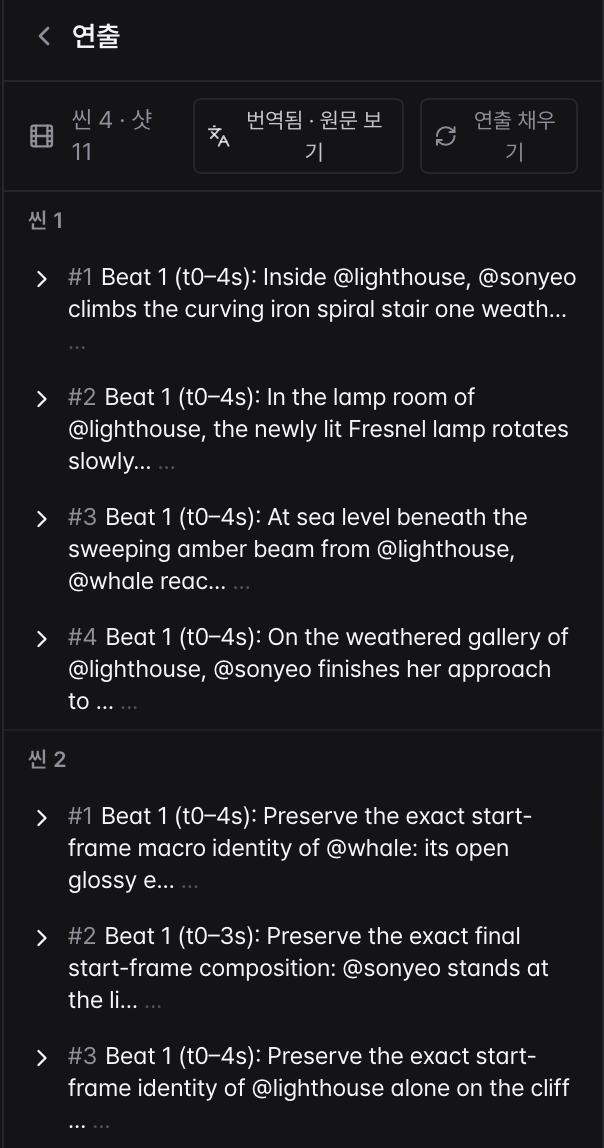
The 'Direction' panel is filled in by the Scene Director for narrative videos that have a world and cast. Open it from the clapperboard 'Direction' (연출) icon in the far-left vertical NavRail; the header shows the scene and shot count as 'N scenes · M shots'. If you haven't built such a video yet, it shows 'No shot direction yet.'
Core flow
- 1
Open the Direction panel
Click the 'Direction' (clapperboard) icon in the far-left NavRail. Click the same icon again to collapse the left column, or click the '<' back header at the top of the panel to return to the 'Create' (Tools) panel.
- 2
Click a shot to zoom the canvas
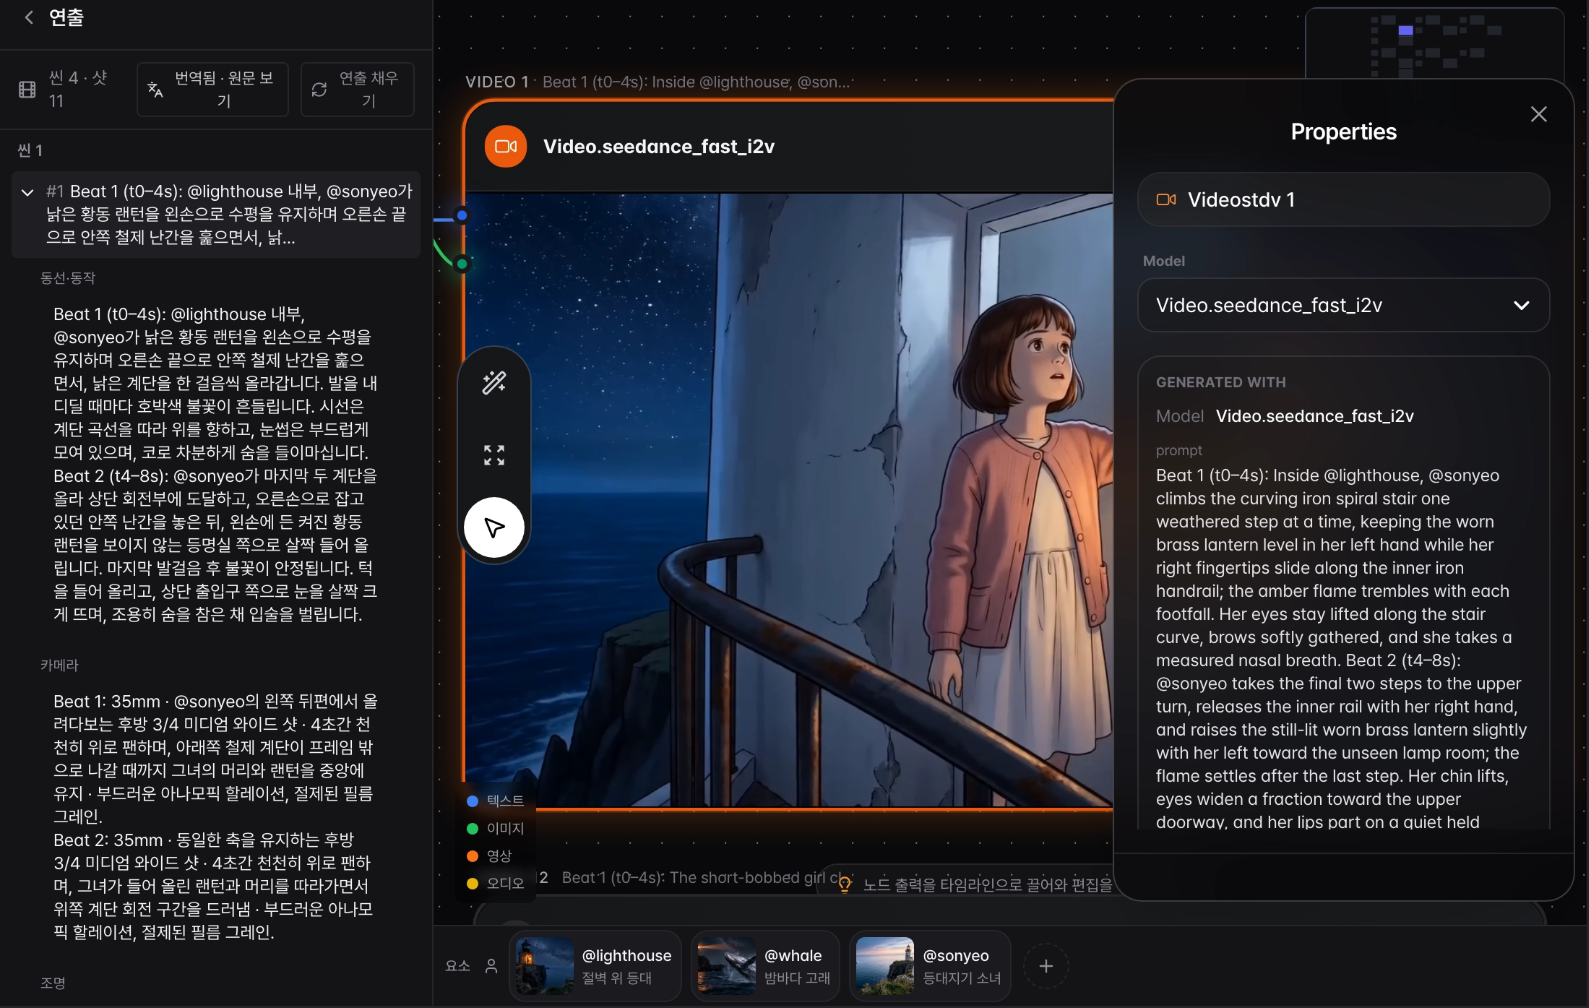
Each scene lists shot rows with a '#1' number and a short action preview. Click a shot row to expand it — the canvas simultaneously zooms to that shot's video node so you can see exactly what you're editing.
- 3
Review nine fields and priority
An expanded shot has nine fields — Intent, Action, Camera, Light, Wardrobe, Audio, Dialogue, End state, and Negative — plus an A/B/C edit priority. Edit a value and click or tab away to auto-save it.
- 4
Regenerate just one part
Click 'Regenerate shot' inside a shot to hand off to the AI chat, which asks 'which part do you want to change?'. Pick 'Regenerate as-is' or one of the seven parts; the AI then asks how to change that part, rewrites only that part, and re-runs just that node.
The nine editable fields
- Intent — the core meaning the audience should read from the shot
- Action — what the subject does
- Camera — angle, movement, framing
- Light — lighting and mood
- Wardrobe — the subject's outfit
- Audio — sound and audio
- Dialogue — a spoken line or caption
- End state — how the clip ends and links to the next shot
- Negative — direction to avoid in this shot (metadata, not injected directly into the generation prompt)
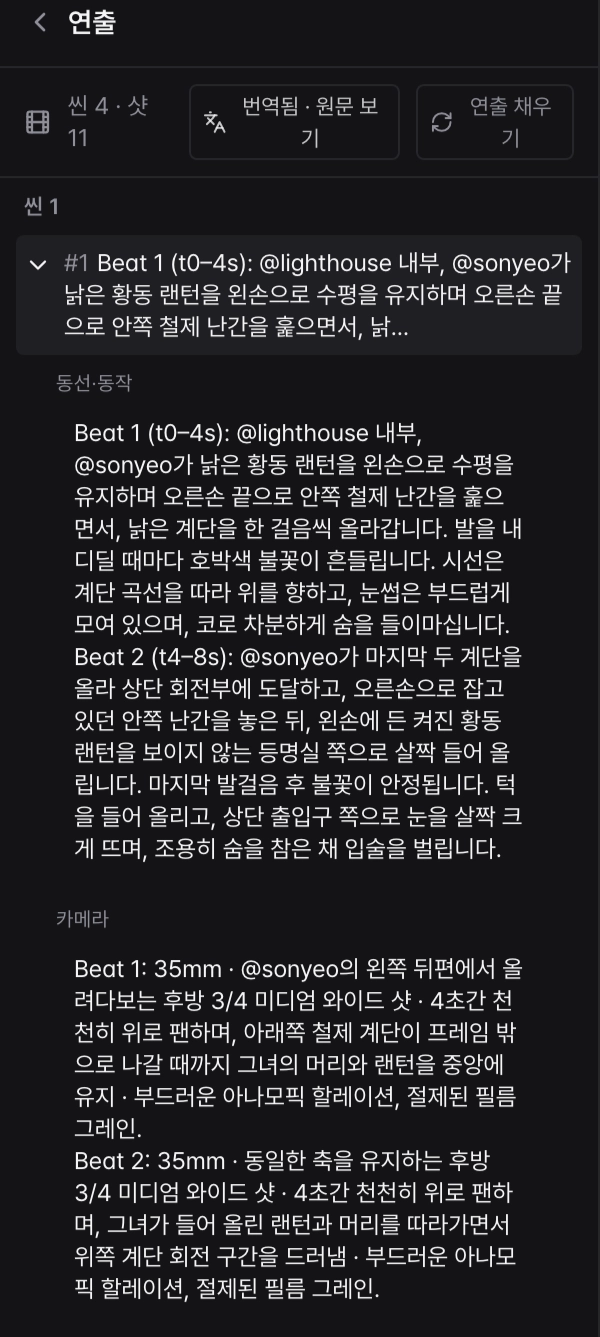
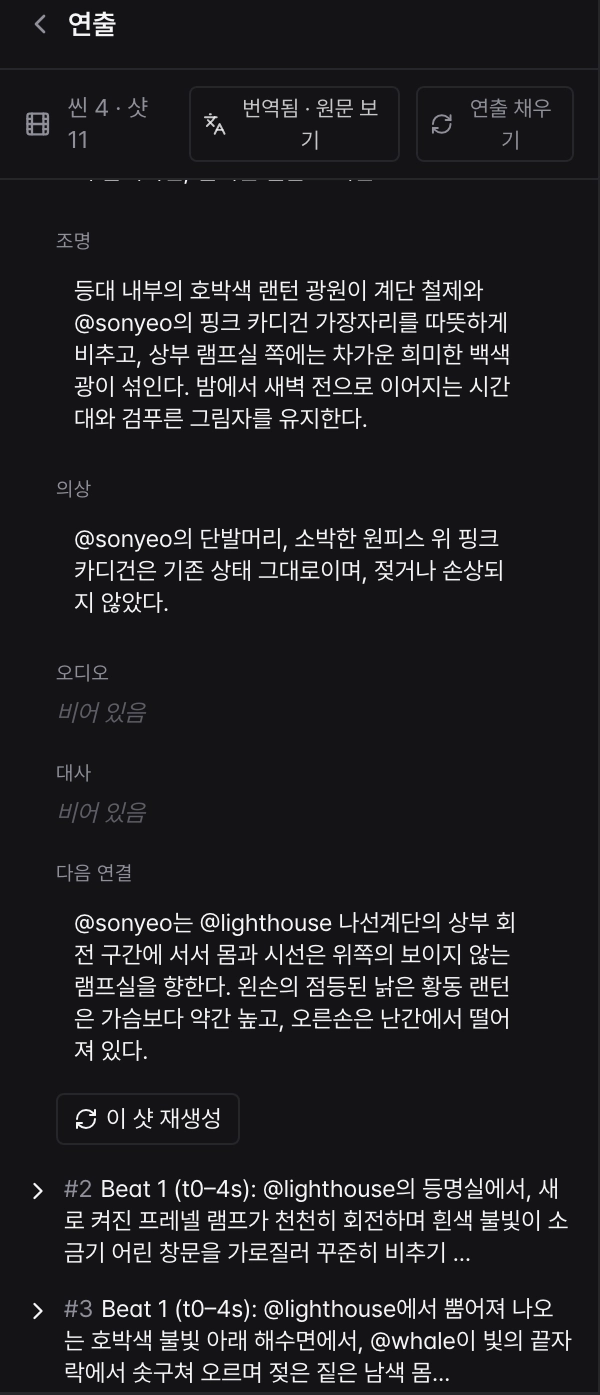
Selective AI regeneration supports seven production fields: Action, Camera, Light, Wardrobe, Audio, Dialogue, and End state. It rewrites only the chosen field while locking the other production fields and @element references. Edit Intent, Negative, and priority directly in the panel.
Good to know
- Use 'Fill direction' (top-right of the header) to backfill direction for videos that don't have any. It skips shots that already have direction (no double charge) and, if it times out, tells you how many it did — just press again for the rest.
- If a shot's direction is in a different language than your app, a translation toggle appears in the header. Switch between 'Show translation' and 'Show original'; in translation mode the fields are read-only — switch to 'Show original' first to edit.
- In a shared read-only project you can browse and focus/zoom shots, use the translation toggle, and read the direction text. The fields, however, are read-only, and the 'Regenerate shot' and 'Fill direction' buttons are hidden.
Editing a field's text only updates the stored direction — it does not re-render the video. To actually see the change, click 'Regenerate shot'. Also, saves happen when you leave a field, so if you navigate away without clicking or tabbing out, your last keystrokes may not be saved. Note this is not pixel/region masking — selectivity is by direction 'part', not a painted area.
Timeline Finishing & Export
The final stage: gather your generated clips on the timeline, arrange them, layer on captions, color grading, transitions, and music, then export the whole thing as a single MP4.
Drag a generated image, video, or audio from the canvas or the Assets panel onto the 'Timeline' dock at the bottom of the screen to add it as a clip. Drop it at a spot on a track, or on the dock's empty margin to start it at the very beginning.
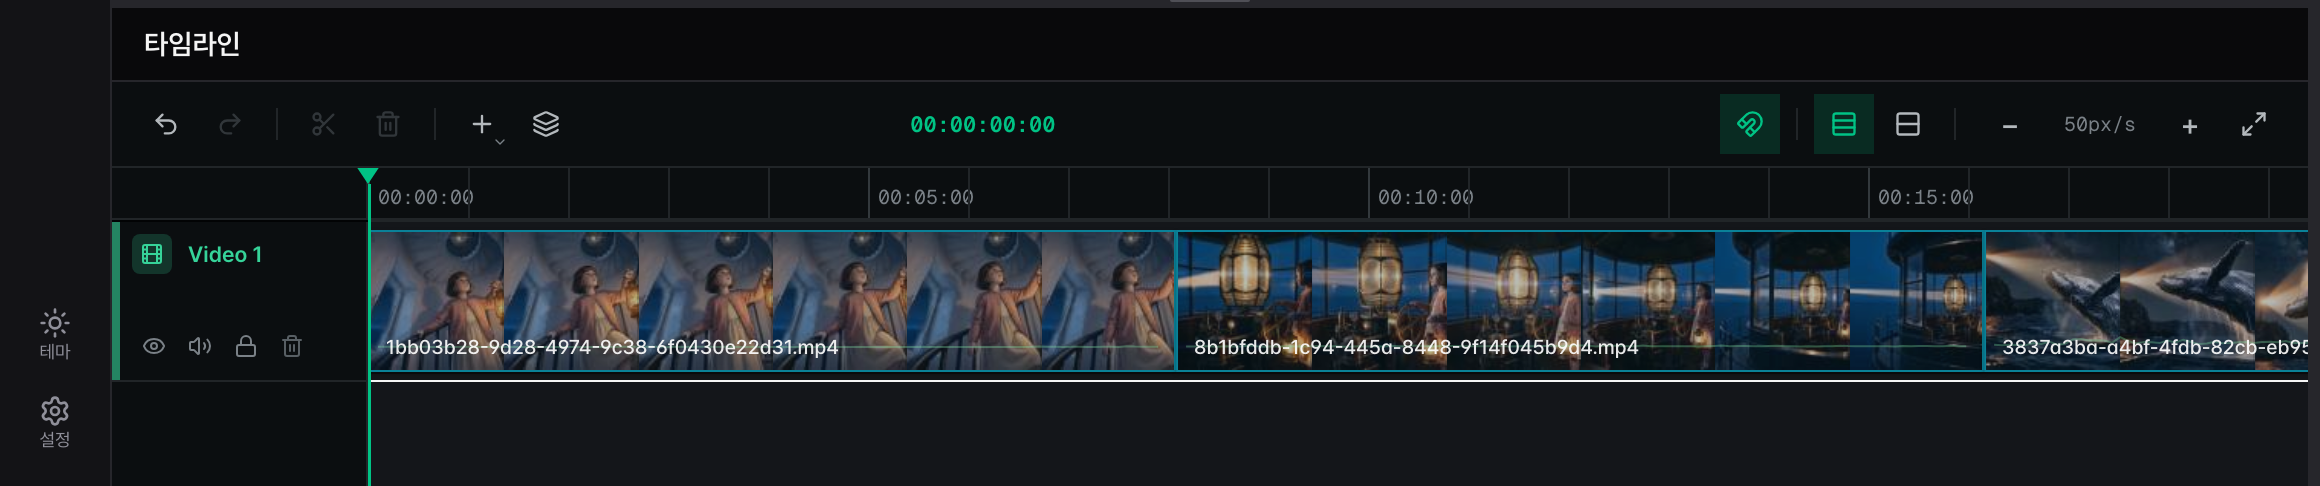
The finishing flow
- 1
Place your clips
Drag your finished generations onto the timeline dock and lay them out in order.
- 2
Tune each clip
Click a single clip to open 'Clip Properties' to the right of the timeline, then adjust its volume, speed, opacity, and scale.
- 3
Add text, grading, and transitions
In the 'Timeline' tab of the Create panel, layer text, color grading, and scene transitions onto the selected clip.
- 4
Fill in the sound
Use AI captions and BGM generation to auto-add subtitles and background music.
- 5
Export
In the top-right of the Final Output preview, pick an aspect ratio and resolution, then press 'Export' to save an MP4.
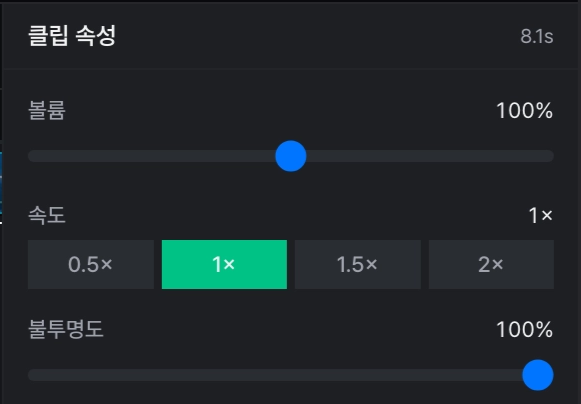
Clip properties (with one clip selected)
- Volume: set the audio level from 0 to 200%.
- Speed: 0.5×, 1×, 1.5×, or 2× presets — the timeline length updates automatically.
- Opacity: fade the clip from 0 to 100%.
- Scale: size the clip up or down within the frame, 25 to 200%.
'Timeline' tab editing tools
- Text/title: insert a title or subtitle at the playhead, then set font (Korean fonts included), size, color, alignment, position, and animation.
- Color grading: a cinematic film-look preset gallery plus fine sliders. 'Auto' corrects it for you, 'Apply to all' copies the look onto every video and image clip, and 'Reset' clears it.
- Transitions: place one of 7 types (crossfade, dip, wipe, slide, zoom, push) between the selected clip and its next neighbor, and tune the duration.
- Beat-sync auto-cut: analyzes the clip's audio beats and splits it in time with the music, all inside your browser.
Sound & caption helpers
- AI captions (selected clip): transcribes the clip's speech into a top 'Captions' track, with auto language detection and optional bilingual (original + translation) lines.
- Caption utility (Tools tab): transcribes video clips with audio and audio clips on the timeline to fill the caption track. Still images are not transcribed.
- Generate BGM: reads the timeline's mood and scores background music across its full length, adding it as a new audio track.
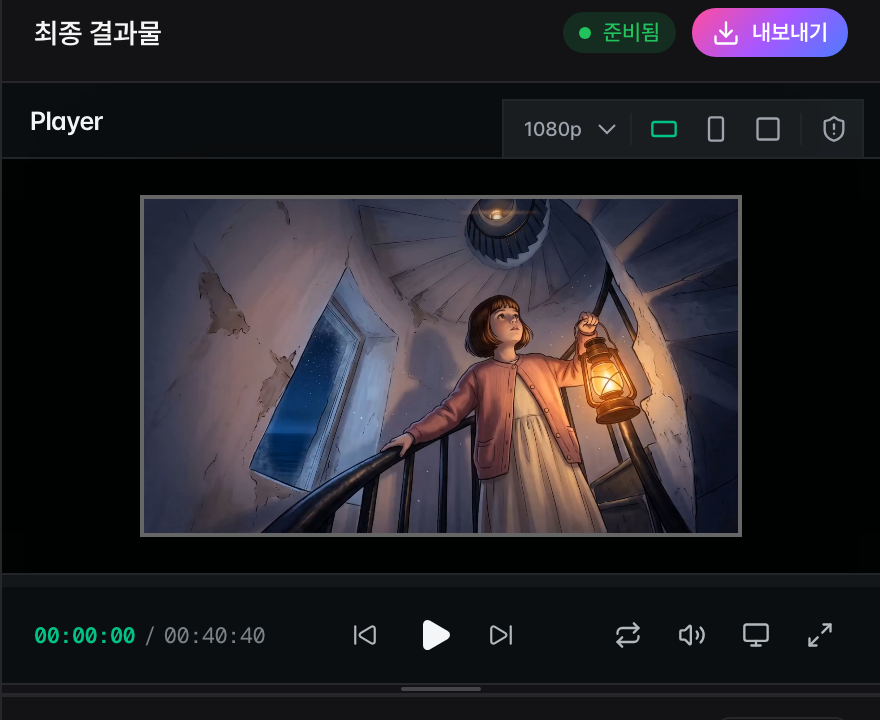
Choose the aspect ratio and resolution at the top-right of Final Output. Export renders the MP4 in your browser, downloads it first, then attempts to save it to the library. A library-save failure does not undo the downloaded file.
If your timeline runs over 2 minutes, 4K is capped at 1080p to protect memory. Exporting on the free plan adds a faint GenPresso logo in the bottom-right. Toggle the shield icon to stamp a small 'AI' mark in the bottom-left.
Collaboration & sharing
Send a read-only public link to people without accounts, or invite specific people by email to co-edit. Signed-in invitees can work together in real time, see who's present, and catch up on notifications from while they were away.
The owner of a canvas (project) can share it two ways from the Share button in the top bar: turn on a read-only public link that anyone can open without an account, or invite specific people by email as Viewers (read-only) or Editors (full co-editing).
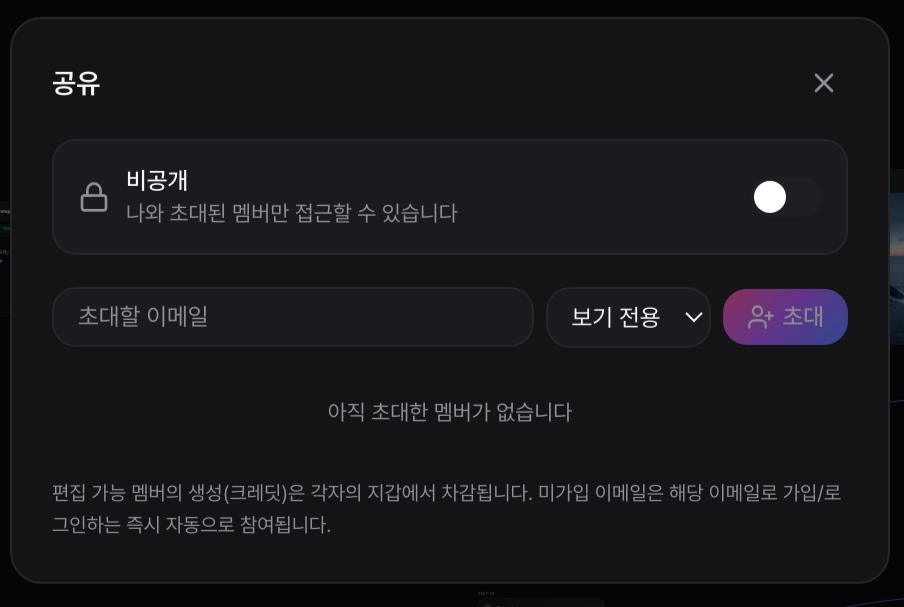
Share and co-edit
- 1
Open the Share dialog
Click the Share button at the top right of the studio top bar. It only appears if you're the owner, and its icon turns green while the canvas is public.
- 2
Turn on a public link
Flip the public-link toggle at the top of the Share dialog to on (it turns green) and a 'Copy public link' button appears. Click it to copy the link, then send it to anyone yourself. They open a read-only view with no login. Flip it back off to unpublish.
- 3
Invite people by email
In the invite row, type the person's email, pick Viewer or Editor, and click Invite. If they already have an account they join immediately; if not, the invite waits as 'Pending signup' and they auto-join the moment they sign up or log in with that email.
- 4
Manage members
Each invited member is listed with their email. Use the role dropdown on their row to switch between Viewer and Editor, and the trash icon to remove them instantly.
- 5
Co-edit in real time
When an invitee opens the same canvas, you co-edit together. Editors can change the graph, timeline, run generations, and use the AI assistant just like the owner; Viewers get a fully read-only studio and watch changes stream in live.
What each role can do
- Owner — the only one who can publish, invite, rename, and change roles. The Share button and rename pencil show only to the owner.
- Editor — can edit and generate like the owner, but generation credits come out of their own wallet. Renaming the canvas is owner-only, so Editors can't change its name.
- Signed-in Viewer — editing, generation, and agent input are locked, but timeline playback and a local MP4 export are available. That export is not saved to the project or library. Anonymous public-link visitors do not see export controls.
Invitation alerts and email delivery
Inviting a specific account sends both an in-app alert and a project-invitation email. Provider acceptance does not guarantee inbox placement, so ask the recipient to check spam and in-app notifications, and send the canvas link separately when needed. An email delivery failure does not revoke project access that was already granted. Team-console invitations use a separate email flow.
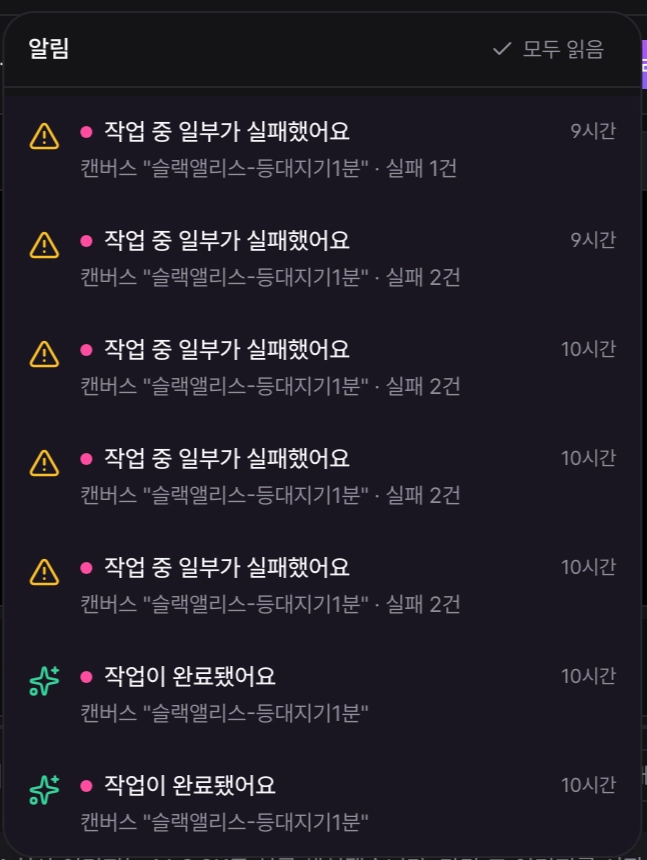
Presence and notifications
- Who's viewing — signed-in invited members appear as colored avatars when they open the same canvas. Anonymous public-link visitors are not shown in this presence list.
- Live cursors — signed-in invited members see each other's named colored pointers on the canvas and timeline. Anonymous public visitors do not broadcast cursors.
- Notification bell — the bell at the top right collects what happened while you were away, such as canvas invites and finished or failed generations. Click an item to mark it read and jump straight to that canvas.
Team workspace
If you own or administer a Team (org/education) workspace, a 'Team' item appears at the bottom of the left navigation rail. This Team console has four tabs — Members, Credits, Billing, and Settings — where you manage members and seats, the shared credit pool, the plan, and team settings. In the left Projects panel you can click the team icon on a canvas you own to move it into the shared 'Team canvases' space so everyone on the team can co-edit it.
Viewers receive live canvas changes but see a static agent thread. Removing a teammate immediately revokes access granted through the team, but does not erase projects they own or a separate direct project membership. Each user can belong to one team. In a shared agent queue, the current selection in the window that gains execution can become the target, so re-check the selected node or clip before a precise edit request.
Credits & Billing
The Billing page (결제 · 크레딧) is the one place to manage your credit balance and payments. Credits are spent every time you generate an image, video, or AI action, and you refill them with a one-time top-up or a monthly/annual subscription.
Check your current balance in the Credits card at the top and track deductions in Recent credit history. One-time top-ups grant 17–21 credits per USD-equivalent dollar by tier, while generation spends at model cost (roughly 30 credits per dollar), so buy and spend rates differ. Subscriptions always use Stripe in USD. One-time top-ups use Toss in KRW when it is configured for the Korean locale; otherwise they use Stripe in USD.
Buy one-time credits (top-up)
- 1
Pick an amount
In Top-up, use the quick-pick tiers equivalent to USD 50, 100, 300, or 600, or drag the slider. With Toss, the same tiers display the actual KRW charge.
- 2
Check the live summary
The panel live-updates the credits you'll receive, the '$1 = n cr' rate, any volume-discount badge, and a hint of how much more to add for a better rate. Bigger amounts give more credits per dollar ($50→17, up to $600→21 cr/$).
- 3
Pay
Click Pay to review the credits, actual billing currency, total, and refund policy. The global/USD path continues to Stripe Checkout; Korean with Toss enabled opens Toss Payments.
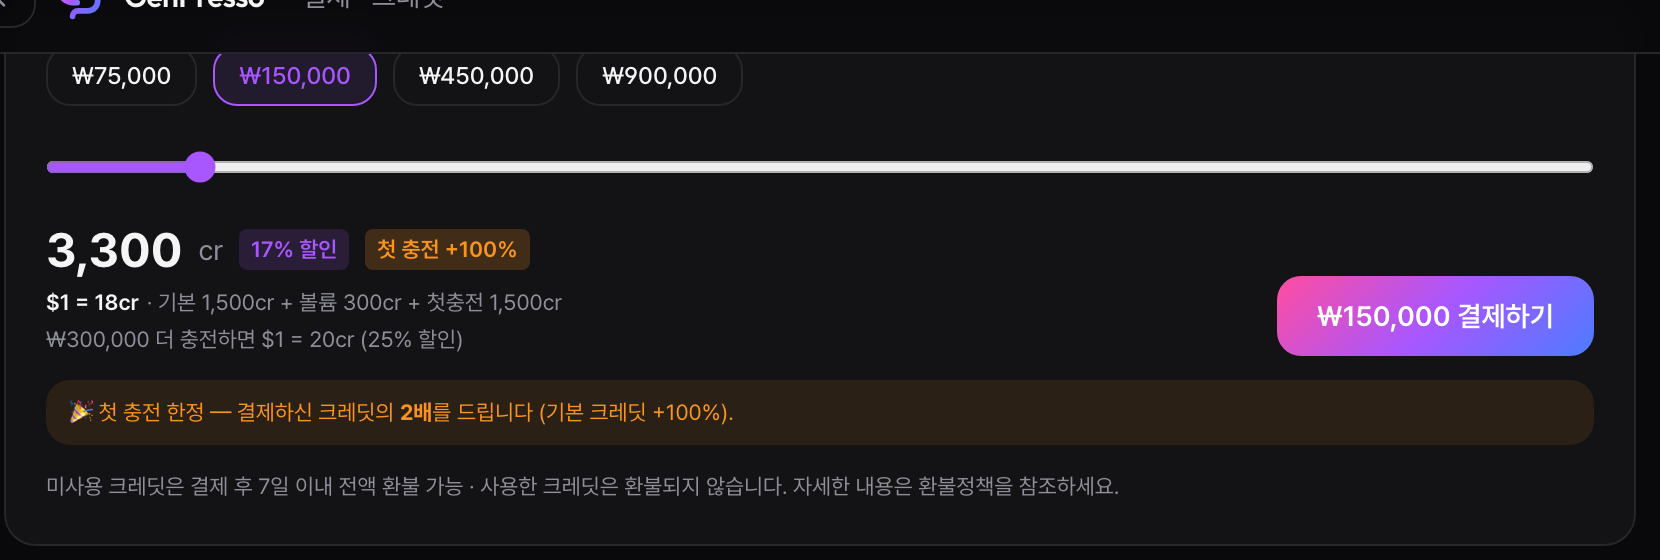
Subscription plans
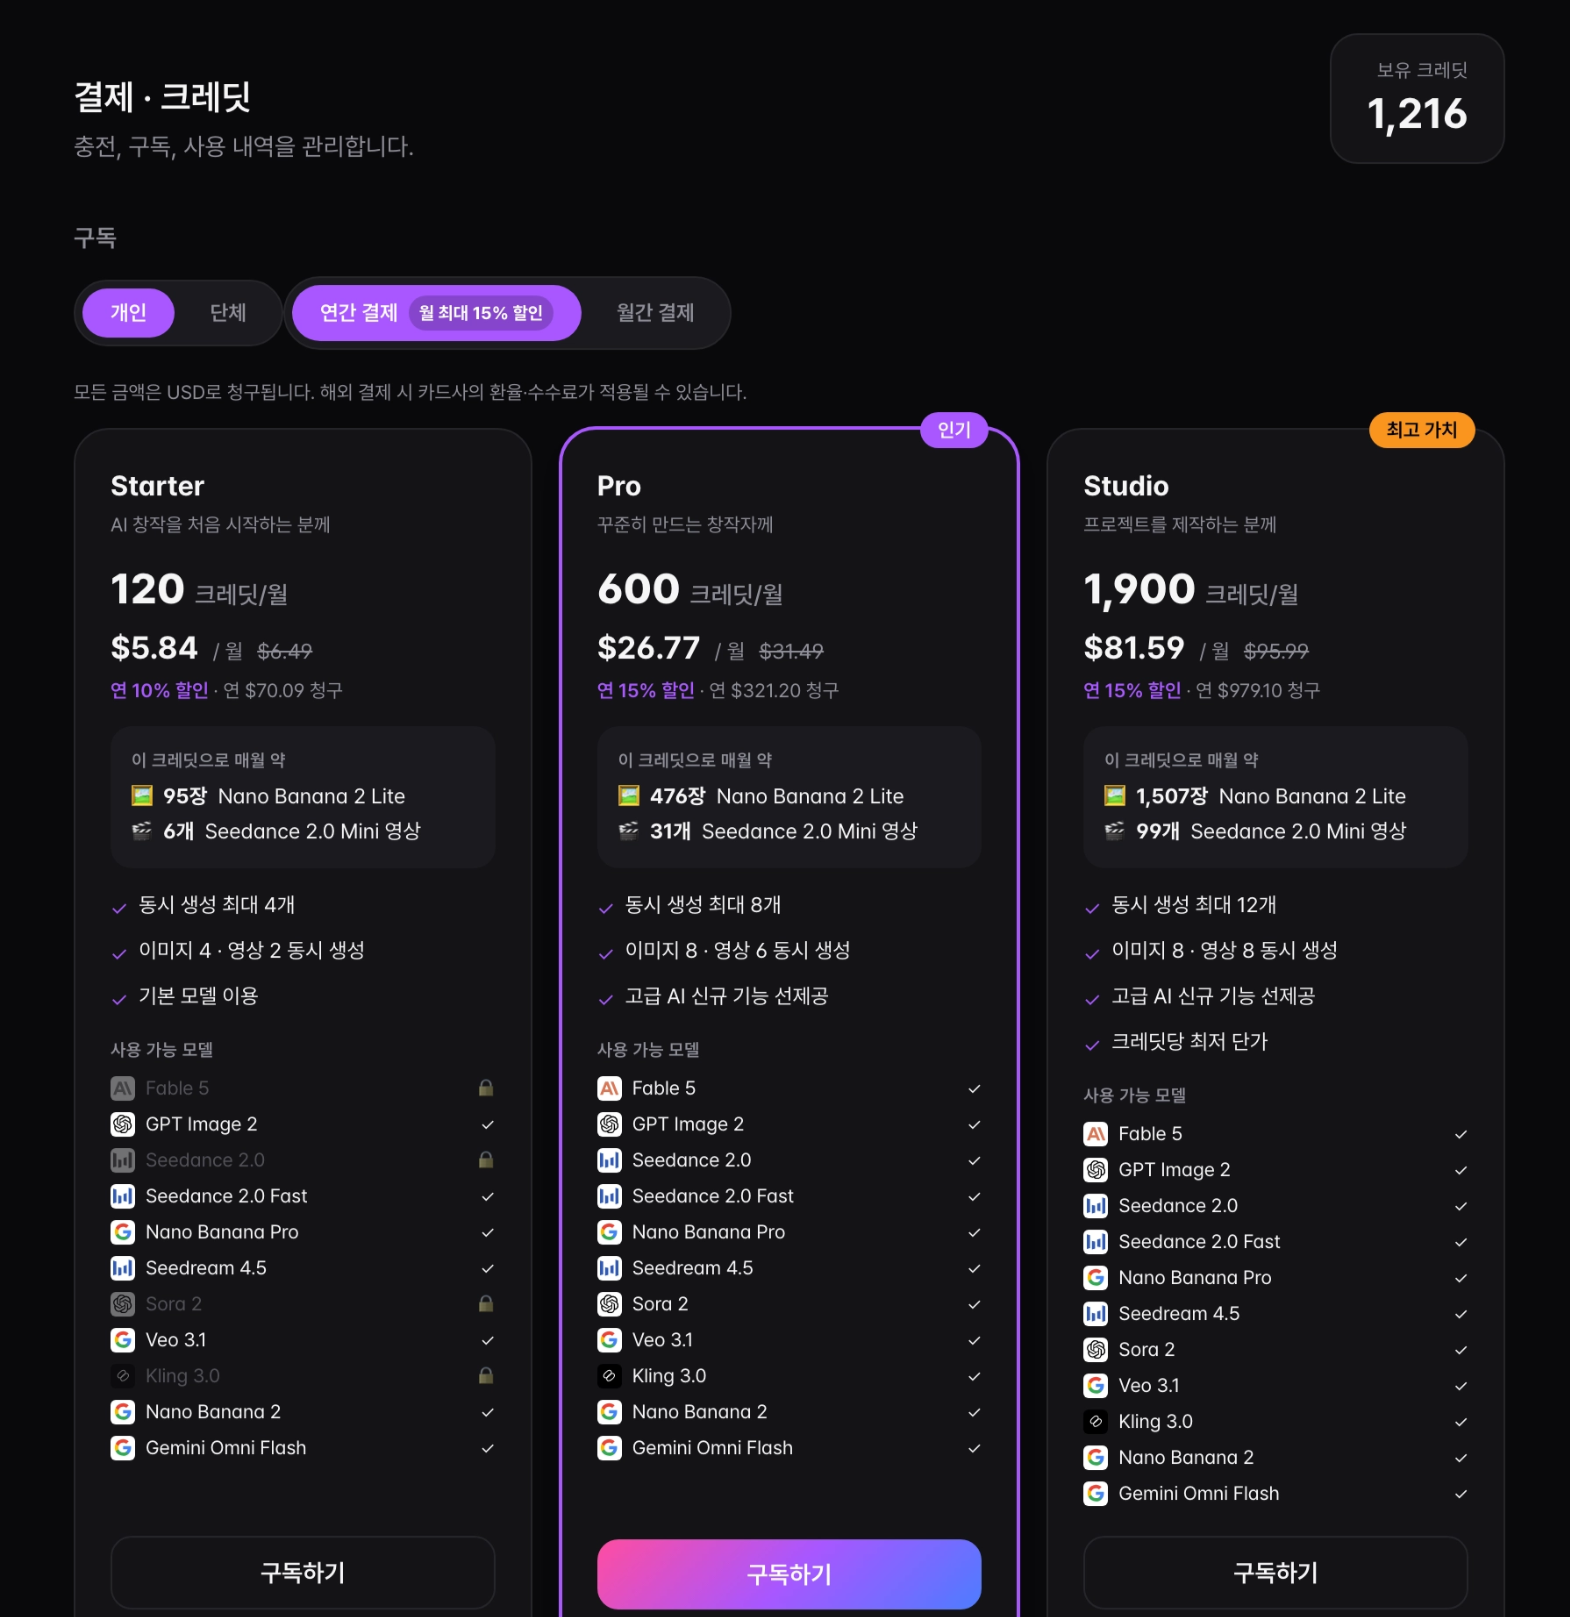
- In the '구독' (Subscription) section, use the '연간 결제 / 월간 결제' (Annual / Monthly) toggle to choose the cycle. Annual is preselected and carries an 'up to N%/mo off' badge; picking it shows the effective monthly price (annual fee ÷ 12) on each card, with the original monthly price struck through.
- Each card — Starter, Pro ('인기'/Popular), Studio ('최고 가치'/Best value) — shows monthly credits, price, a rough images/videos estimate, the concurrent-generation limit (4/8/12), and which models it unlocks. Click '구독하기' (Subscribe), confirm the auto-renewal notice, and continue to payment. Going over the concurrency limit doesn't fail — extra requests simply queue and run in order.
- While subscribed, '업그레이드' (Upgrade) on a higher card applies instantly with a prorated charge and matching credits; '다운그레이드' (Downgrade) on a lower card takes effect from the next renewal with nothing charged now. '구독 취소' (Cancel) ends access at period end, and '구독 유지' (Keep subscription) instantly resumes a scheduled cancellation.
- '인보이스 · 결제수단 관리' (Manage invoices & payment method) opens the Stripe Customer Portal to view invoices and update your card (available once you have a prior payment). Where team plans are enabled, an Individual/Organization (개인/단체) toggle switches to Education, Team, and Enterprise plans (Team needs a 3-seat minimum; Education requires institution approval).
More ways to top up and save
- If you've never topped up, the card shows a '첫 충전 +100%' badge and your first paid top-up automatically grants double the base credits (once per account).
- Under '크레딧 자동 충전' (Auto-refill), click '관리' (Manage) to set the refill amount, threshold, and monthly cap, tick the consent checkbox, and click '저장' (Save); when your balance drops below the threshold, your saved card is charged at a fixed $1 = 18 credits ('끄기'/Disable turns it off anytime).
- In the '쿠폰' (Coupon) section, type a code and click '등록' (Redeem) or press Enter to add the credits and refresh your balance.
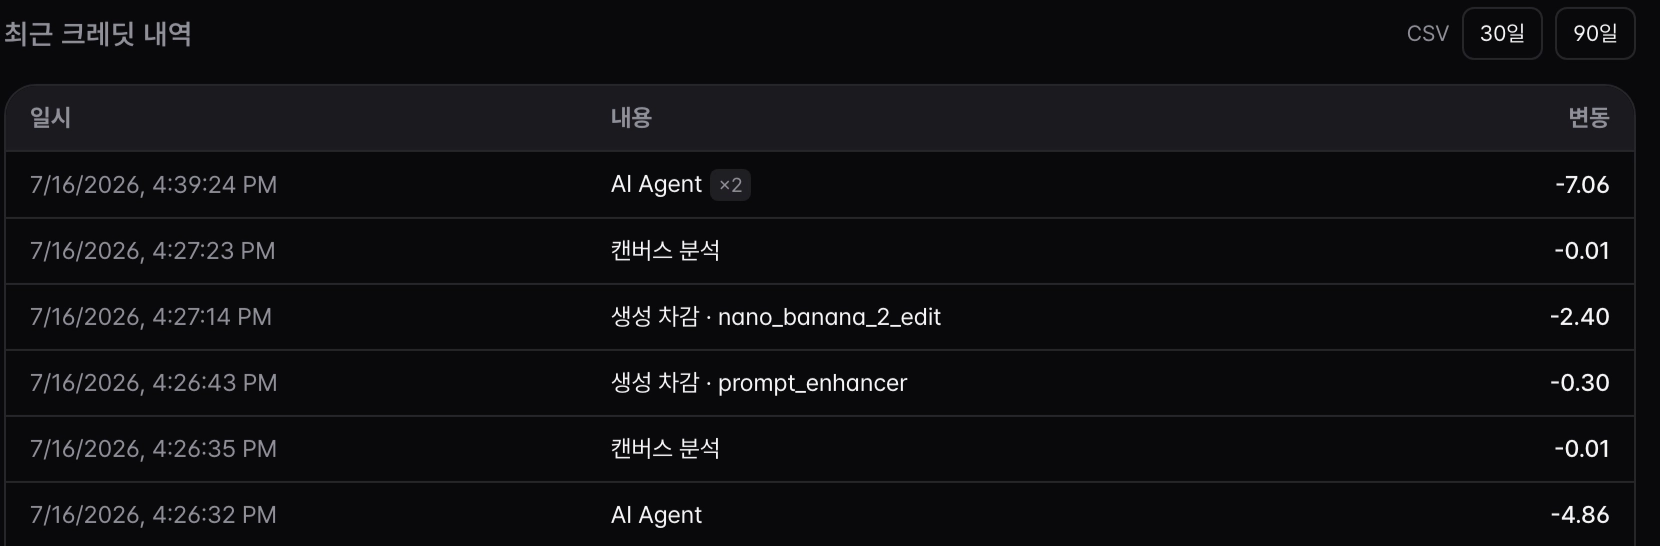
The '최근 크레딧 내역' (Recent credit history) table lists date, description, and change (+/-) for up to 20 grouped rows (repeats collapse into '×N'). For the full record, use the '30일' or '90일' buttons next to 'CSV' to download it. If expiry is enabled for your account, a note under the top-up section explains that top-up credits last 90 days, subscription credits 30 days, and the soonest-to-expire credits are always used first.
Within 7 days, a completely unused purchase may be refunded in full; after partial use, only the unused remaining credits are eligible, never the spent portion. Auto-refill requires a saved subscription card and explicit consent. An admin-granted tier is model access, not a paid subscription or monthly credit grant. Subscriptions and Stripe top-ups charge USD and may incur issuer conversion fees; Toss top-ups charge the displayed KRW amount.
MCP — use GenPresso from Claude & ChatGPT
Connect the GenPresso MCP server to an AI assistant like Claude or ChatGPT and generate images and video right from the chat. Results land as nodes on your GenPresso canvases, ready for upscaling, editing, and timeline work in the studio.
Connect in four steps (Claude)
- 1
Add the connector
In Claude Settings → Connectors, click 'Add custom connector', name it GenPresso, and enter https://genpresso.ai/api/mcp as the URL.
- 2
Sign in to GenPresso
A browser window opens — sign in with your GenPresso account and approve the connection. No API keys to create or paste.
- 3
Generate by chatting
Ask things like "use GenPresso to make an image of a sunset over the sea" — the assistant picks or creates a canvas and runs the generation. Credits are spent from your signed-in account at the same rates as the studio.
- 4
Continue on the canvas
Open the canvas via the link in the response and the result is there as a node. It behaves like any other node — upscale it, use @element references, place it on the timeline.
ChatGPT connects with the same URL via Developer mode under Settings → Connectors (availability varies by plan and version). For the full tool list, limits, and troubleshooting, see the 'MCP' link in the footer at the bottom of this page.
常见问题
When are credits used, and how do I refill them?
Credits are spent every time you generate an image, video, or run an AI action — and the agent building it for you bills exactly the same as a manual click. Refill on the Billing page with a one-time top-up or a monthly/annual subscription.
If a generation fails, do I lose the credits?
No — failed generations are automatically refunded, and transient provider errors (especially for video) are retried a few times on their own. If a node shows a failure message, read the note and just re-run it.
What's the difference between Auto and Manual mode?
In Manual mode the agent proposes a plan with Generate, Edit, and Stop choices, so credit-spending generation starts only after you confirm. In Auto mode it builds immediately without a separate confirmation and pauses only at checkpoints that still need your input, such as a long-running build.
How do I keep the same character (or product) across shots?
Register an actor (character), place, prop, or audio under a short @handle, then reference that handle explicitly in each generation. Personal elements can be reused across your canvases, while team-shared elements are available to members of that team.
How do I share a canvas to work with others?
Use a read-only public link when you only need to show the canvas without sign-in, or invite a specific account as an Editor to co-edit. Inviting sends both an in-app alert and a project-invitation email, while live avatars and cursors appear only for signed-in invitees. If the email is not visible, check spam and in-app notifications or send the canvas link separately.
Which model is used, and can I choose it?
By default GenPresso auto-routes the right model for each task (image, video, and so on), but you can pin a specific one in the per-task model picker. Different models have different credit costs, so quality and price vary together.
How do I export the finished video?
Drag the media you made in nodes onto the timeline, arrange clips, subtitles, music, and color, then export it as a single video. The "AI" watermark is off by default and can be turned on if you want it.
Can I fix just one shot without regenerating the whole video?
Yes. In the left Direction panel, focus the canvas on a shot and edit its nine fields and priority directly. From Regenerate shot, choose one of the seven production fields so AI rewrites that part and re-runs only that node.
Can I use GenPresso directly from Claude or ChatGPT?
Yes. Add the GenPresso MCP server (https://genpresso.ai/api/mcp) as a custom connector and sign in with your GenPresso account — then generate images and video by chatting, with results landing on your canvases. See the 'MCP' link in the footer for setup and the tool list.